Thursday, April 6, 2023

Honey-glazed Cranberry and Apricot Hot Cross Buns - Sinful!

Pin It

Yikes! Nearly forgot to make Hot Cross Buns. I've made several versions, but these are still my favourites. You still have time to make them for tomorrow!


Hot Cross Buns, Hot Cross Buns, One a Penny, Two a Penny, Hot Cross Buns

Hot Cross Buns have been a part of Easter for a very long time (how long depends on what version of history you believe - but they may have originated in the 14th Century or even earlier). They would originally have been plainer, as dairy products were forbidden to Christians during Lent, and the Mixed Spice would have been hugely expensive, and anyway, wasn't in common use until the early to mid-19th Century. Here, they have been updated further with the addition of a Tangzhong roux which helps lock in moisture and keeps these buns deliciously light and fresh. 

This recipe may seem long, but no step has actual ‘hands on’ time of more than a few minutes and I think the result is worth the effort. Read the entire recipe first to make sure you have all the ingredients, and complete the steps in the order given. I recommend a stand mixer with a dough hook for this as it is quite a sticky dough to begin with, but if you do it by hand, you’ll have worked off enough calories to eat more than your fair share J

In essence, the steps are: make Tangzhong roux; make dough; make paste for cross; bake; brush with warm honey; eat with a good cuppa


Hot and Cross? Anything but!

Ok, here goes…

For 18 - 24 sinfully sticky buns, you will need...
... to preheat the oven to 180°C when ready to bake

For the Tangzhong roux
40g strong white flour (bread flour)
200mls water

Mix the two ingredients together in a small saucepan, slowly whisking in the water to create a lump-free liquid. Place over a medium heat and stir until the mixture begins to thicken. Continue cooking for another minute or so until you have a thick, creamy almost translucent paste. Remove from the heat and leave to cool to room temperature.

__________________________________

For the dough
50g ready-to-eat dried apricots, cut into small pieces (about the size of sultanas)
50g cranberries, halved
50g sultanas
10g mixed peel (candied peel)

580g strong white flour (bread flour)
80g sugar
1 teaspoon fine table salt
2 teaspoons mixedspice
1 teaspoon ground cinnamon
1 teaspoon grated orange zest
1 sachet of fast action dried yeast (7g)

1 tablespoon olive oil
1 large egg, beaten 
260mls fresh milk (heated to between 37-39°C)

a little extra flour for dusting the work surface and your hands for kneading
a little extra milk to brush the buns before they go in the oven

Method
Put the flour, sugar, salt, mixed spice, ground cinnamon, orange zest, and dried yeast (keeping the yeast away from the salt) into a large bowl or stand mixer. Mix to combine.

In a separate small bowl put the dried fruit and mixed peel and cover with boiling water – cover and set aside until the dough has had its first rise. (This plumps up the fruit and helps to prevent it stealing valuable moisture from the dough.)

Add the prepared Tangzhong paste to the flour mixture along with the olive oil, beaten egg and milk and mix until just combined. Once you have a smooth mixture, leave for 10 minutes so the flour can absorb some of the moisture and make a less sticky dough (thank you Dan Lepard for that tip).

Next, knead the dough in your stand mixer or by hand for about 5 minutes until it is smooth and elastic. Cover and leave in a warm place to rise until about doubled in size.

When the dough has risen, drain and dry the fruit on paper towels before proceeding with the next step.


Turn the risen dough out onto a lightly floured board and gently knead for a minute or so.  With your fingers, press it out into a sheet about 1cm thick and sprinkle the fruit over, leaving a margin of about 6cm around the edges. Fold one edge two thirds of the way over the sheet, and fold the opposite side over this, so you have a long, narrow rectangle. Press down with your fingers to encase the fruit inside, expanding the sheet once again. Repeat the folding process one more time, then knead the dough lightly to form a ball. (All this helps to distribute the fruit evenly).


Now, weigh the dough and divide it into 24 even portions for small buns, or 18 even portions for monstrous buns.  Shape the portions into smooth round balls, and place in a lightly oiled baking tin around 23cm x 33cm leaving a little room between them and their neighbours. Cover with a lightly oiled sheet of cling film and leave until the buns have doubled in size and snuggled up to their neighbours.


__________________________________

Brush gently with a little milk before completing the next step.

Next, pre-heat the oven to 180°C. While the oven is heating, make the flour paste for the cross decoration below:

For the cross decoration
100g plain flour
75mls cold water

Mix the two ingredients together in a small bowl until you have a smooth and lump-free paste that holds its shape. Place in a small piping bag (a baking parchment cone with a small hole snipped is perfect). You could use a sandwich bag with the corner snipped off but I’m trying to avoid gratuitous use of plastic where possible. Pipe a long line down the centre of each row of buns, following the contours of the dough. Then pipe lines across the middle of each row to form crosses.


Place in the pre-heated oven and bake for about 15 minutes or until risen and golden.

Tip: I like to turn my oven into a sauna for these, and it helps them rise better by keeping the crust soft until the dough has had time to puff up. To do this, place a baking tin half-filled with water on the bottom shelf of the oven when you pre-heat it. Be super careful when opening the oven as you will release a cloud of scalding hot steam.
__________________________________ 
For the honey glaze
2 – 3 tablespoons runny honey, warmed (place in a heatproof bowl and stand the bowl in hot water for a couple of minutes, or nuke it in the microwave for a few seconds until warmed through.).

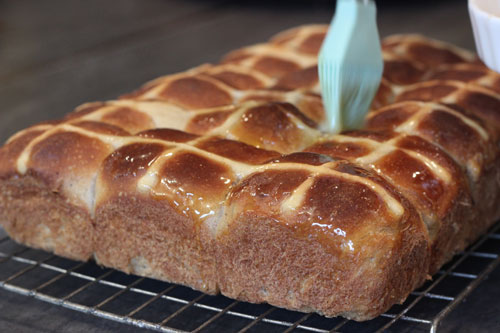
When the buns come out of the oven, brush with the warmed honey.


It is considered good luck to share these buns and the cinnamon and orange make them particularly good with coffee so what better excuse to invite some friends over!

They are good just as... but even better toasted and smothered with salty butter.


Happy Easter! 
x


First published 31 March 2020

Pin It

Friday, October 28, 2022

An Ode to Colcannon – from a Conscientious Objector to Cabbage!

Pin It

I’ve been having a bad week in my kitchen – you know the kind of week where nothing quite goes as expected. The worst was my attempt at making chocolate caramels. They turned out fine - dark, chewy, and very, very moreish. However in the process of getting the mixture up to temperature, I enamelled my favourite stainless steel saucepan. It has taken a week of inventiveness and ingenuity to remove the shiny black sugar coating from the metal. I believe I have invented a substance that NASA might want to consider for tiling the space shuttle.

Moving swiftly on... imagine it is a perfect Halloween evening – wild and stormy. There’s a log fire blazing and an open bottle of wine on the mantelpiece.

Traditional Irish Colcannon for Hallowe'en (though any excuse will do)

On the menu: corned beef with colcannon. The corned beef is a cinch to cook. Rinse it, weigh it and pop it in a pot just large enough to take it and a few ancillary vegetables. Add an onion and sprinkle in a large pinch of ground cloves. Bring it to the boil, then cover and turn the heat down to a gentle bubble, giving it 25 – 30 minutes per pound/half kilo.  The piece I’m cooking is 1.5kg or about 3lb and will take an hour and a half. I’ll fling a few carrots in to the pot about half an hour before the meat is finished cooking. Really, the meat is just an excuse to make its perfect partner – a dish of butter, peppery colcannon (cál ceannann).

As a conscientious objector to cabbage, I astound myself with my devotion to colcannon – which is essentially buttery mashed potato mixed with finely chopped curly kale (fancy cabbage, but cabbage all the same). Traditionally eaten at Halloween, I shamelessly sneak it into meals whenever I can find kale.

About fifteen minutes before the beef is finished cooking, prepare the colcannon.


For 4 people, you will need...

4 – 6 potatoes (I use Rooster – a good, floury potato)

50g Irish butter

110 mls hot milk

a large pinch sea salt

white pepper to taste

200g curly kale (or leafy green cabbage)

4 spring onions (scallions) finely chopped

An optional extra 50g butter to bury in the mash


Method

1    Peel the potatoes and cut into slice about ½ cm thick. Place in a saucepan and barely cover with cold water. Bring to the boil. Turn down the heat to simmering, cover and simmer gently for 15 minutes, or until the point of a knife easily pierces the potato slices.

2    While the potato is cooking, add the curly kale (or green cabbage) to another saucepan of boiling water with a teaspoon of salt. Cover and boil for about 5 minutes or until tender. Drain and chop very finely.

3    When the potatoes are cooked, drain the water from the saucepan and leave the potatoes uncovered for a minute or so until most of the steam has evaporated. Add the butter and hot milk and, using a potato masher or a sturdy hand-held whisk, reduce the potato to a smooth mash. (Don’t be tempted to go mechanical as it overworks the potato and can result in an unpleasant gluey mess). Add salt and white pepper, mixing thoroughly. Taste and add further salt and pepper if necessary.

4    When you have prepared the basic mash, add in the curly kale or cabbage and chopped spring onions. Transfer to a warm serving dish with the optional extra 50g of butter cut into three pieces and buried deep in the fluffy mixture to melt into little pools of gold.

((f(First published Oct 2010)


Pin It

Thursday, September 29, 2022

All-in-one Pita Bread – best supporting actor !

Pin It

Pita is as plain and simple as a fact of life or the bald-faced truth... There is just no embellishing it. It is a back-drop for better things; the base melody; the supporting actor. Unfortunately... when the back-drop is flawed, when the base melody is off key, when the supporting actor stinks, it is all too obvious.
I bought pita recently and it wasn’t Oscar-winning material by a long stretch. As well as the handful of ingredients essential to creating this simple bread, it contained a list of extras as long as your arm, all there to extend shelf-life.
If pita isn’t up to scratch, then it drags down the rest of the meal. However, when this pocket bread is good, it is a building block of snack perfection, the perfect party bread, the best supporting actor in a luscious portable lunch.
Warning: once you have tasted homemade pita bread, commercially-produced stuff will never be good enough ever again.

For 8 perfect pita pockets you will need...
... to pre-heat the oven to 225°C at step 3

350g plain flour
125g finely ground wholemeal flour
7g sachet of fast acting dried yeast
2 tablespoons extra virgin olive oil
1 tablespoon honey
1 teaspoon fine table salt
280ml tepid water (35 - 38°C)              


1.      Place the first six ingredients together in a large mixing bowl. Add the warm water and mix until the ingredients come together in a ball. Turn the dough onto a lightly floured surface and knead for about 7 - 10 minutes until the dough is smooth and silky. To knead, fold the dough in half, then holding it in place with one hand, use the heel of the other hand to stretch the dough away from you, along the floured surface. Again fold it, rotate it about 1/8th of a turn and again press it away from you with the heel of your hand. Repeat, enjoying the yeasty scent and the silky feel of the dough as any woe or stress dissipates through your hands – bread-making is cheap therapy. (If, however, you have no woes, and possess a stand mixer with a dough-hook, 5 minutes in the machine will be sufficient.) Return the dough to the mixing bowl and cover with cling film or a clean tea towel. Leave in a warm, draught-free spot for about 2 hours or until doubled in size.
2.      Divide the dough into eight equal pieces, kneading each just long enough to shape it into a smooth ball. Flatten into a disk and leave to rise until again doubled in size and a finger poked into the dough leaves an indent (about an hour). If the dough springs back into shape, leave it to rise for a further half hour then test again.
3.      When you are ready to cook the bread, pre-heat the oven and boil a kettle of water. Place a baking dish on a lower shelf in the oven and carefully add some boiling water. This creates the perfect steamy atmosphere for this bread.
4.      While the oven is heating, roll out the dough disks into rounds about 3mm thick. Put 2 or 3 on a baking sheet and place in the hot oven. After about 3 minutes they will have puffed up impressively. Remove them from the oven before they’ve had a chance to turn golden (You can see I was so busy with my camera, I forgot that instruction myself and a few of them acquired a bit of a tan!) Cool on a wire rack. Cook the remaining breads.


My favourite way to use pita is to toast it then fill it with felafel and all the trimmings.
Yum!
Pin It

Friday, August 26, 2022

Scotch Eggs ... are Indian, apparently!

Pin It


Fortnum & Mason claim to have invented the Scotch egg, and have been selling it since 1738. However they may have been inspired by Nargisi kofta – a dish from the much earlier and more exotic setting of the Mogul Empire. Whatever their origins, Scotch Eggs were one of the few nice eggy things I got to cook at school and I have been addicted to them ever since. They are best consumed on the day they are made, otherwise the crust loses its crunchiness – and then, what’s the point?! These contain bacon to make them extra delicious and succulent. 

For 4 sensational Scotch eggs, you will need...
... a deep fat fryer

6 eggs (4 to boil, 2 to use in the coating)
400g good quality plain sausage meat

1 small onion, finely chopped
100g bacon lardons, (or rashers) finely chopped
1 teaspoon ground cumin
1 tablespoon parsley, finely chopped

1 tablespoon thyme, finely chopped
1 tbsp whole grain mustard (or strong Dijon / English mustard if you prefer)
60g flour
150g fresh white breadcrumbs
Salt and freshly ground black pepper

a little butter or sunflower oil for frying the onion and bacon
Sunflower oil for deep frying

Place 4 of the eggs in a saucepan of cold water and bring to the boil. Simmer for 6 minutes (for a just-set egg - or longer if you prefer them done a bit more), then carefully drain away the boiling water and cover the eggs with cold water, changing it once as it becomes warm with the heat of the eggs. Leave to cool.

Meanwhile, gently fry the onion in a little butter or sunflower oil until softened (about 12 minutes) and beginning to turn golden around the edges. Transfer to a mixing bowl to cool completely. Next fry the bacon, and add to the cooling onion.


Bacon makes everything better
When the onion and bacon have cooled, place the meat, cumin, herbs, and mustard in a bowl and mix well – hands are best (I keep a box of disposable food-quality gloves handy for jobs like this). Divide the mixture into four equal portions – approximately 120g each if you want to weigh them out.


Shell the eggs – my preferred way is to crack the shell, then slip a teaspoon beneath the shell and carefully work it off.

Line up 3 bowls or shallow dishes (I find pie dishes are great for this job). Put the flour into the first dish with a pinch of salt and some freshly ground black pepper. In the second dish, beat the remaining two eggs together with a pinch of salt. Tip the breadcrumbs into the third dish. Lay a sheet of cling film over a chopping board and place one of the sausage meat portions on top. Cover with another sheet of cling film, then either pat with your hands or roll with a rolling pin until the meat forms a patty big enough to wrap an egg. Repeat with the remaining portions of sausage meat until you have four more or less identical patties. This helps keep the blanket of sausage meat an even consistency.
Coax the meat around the egg, thinking Rugby! not football for the shape
Now, take one of the hard-boiled eggs, dust it with the seasoned flour, then place it in the centre of a patty. Encase the egg in the sausage meat, coaxing it around the egg until it covers it evenly. (Think rugby rather than football for the shape). Repeat with the remaining eggs.

Now begins the ‘sheep dip’ (Tip: If you use just one hand to do the dipping, it makes life a bit easier).
Flour...

Egg...

Breadcrumbs...
Dust the sausage-covered eggs with flour, drench them with beaten egg, then cover them with breadcrumbs, pressing gently to ensure maximum coverage. Return the breadcrumbed eggs to the egg bath, completely drenching them again, then return them to the breadcrumb dish, and once again, give them a generous coating, pressing gently to ensure maximum adherence. Every crumb you can manage to stick to the eggs is one more morsel of crunchiness.


Fill your deep fat fryer to the recommended level with sunflower oil. Heat the oil to 170°C and carefully add the eggs. Cook until deep golden brown (about 7 minutes), turning occasionally. Remove from the hot oil and rest them on kitchen towel for a few minutes before serving. Piccalilli is a good accompaniment.

Piccalilli is a good accompaniment.


Pin It

Friday, July 29, 2022

An Accidental Paella – the case for the defence ...

Pin It


While poor Jamie Oliver attracted the wrath of a nation, I managed to get away with my version of "Pie-Ella". There are no mountains, there is no sea, there is not even a pinch of tradition, but ¡Dios mío! it tastes great!


The moment I hit “Publish”, the paella police were on their way over ...

The crime...
Taking a traditional celebration of the mountains and the sea, removing the tradition, the mountains and the sea, and turning it into mid-week WOW* supper.
*War on Waste

The plea... guilty, but unrepentant...
Your honour, I swear I had no idea what I was doing when I opened the fridge. I was day-dreaming about a trip I had to Majorca in the distant past. My personal rain cloud accompanied me, and how! The island suffered the worst storms and floods in decades - just for those couple of weeks I was on holiday. However, I remembered a plate of golden paella I ate there, shivering on a sheltered terrace watching a feeble sun battle in vain against storm clouds. It was utter comfort food.
Hi! Remember me!

Mitigating circumstances...
Perhaps that's why I turned away from the straight-and-narrow of my go-to creamy chicken curry for this quick and easy mid-week supper. This week’s budget doesn’t run to prawns and rabbit, but I am pretty sure that paella evolved from humble origins, making the most of available ingredients. Plus, one pan, and about 30 minutes - what's not to love?
One pot, 30 minutes - what's not to love!

The evidence...
Anyway, back to the fridge, which revealed the remains of a cooked chicken – yawn... However, the fridge also held a jar of pimentos del piquillo (sweet roasted red peppers – widely available) which can add sunshine to any dish, as well as a nub of chorizo left over from the Cornish-ish pasties last week and I found myself taking a detour. “I can resist everything - save temptation”, as one of my fellow countrymen put it so beautifully.

The witness for the defence
Your honour, I call my rice-hating beloved who shovelled three helpings into his mouth while sighing rapturously – ok so he’d missed lunch but even so! Perhaps I should offer some to the paella police or would that compound the crime with bribery? 

For 4 servings you will need...
3 tablespoons extra virgin olive oil
1 onion, finely chopped
1 fat clove of garlic, crushed
50g chorizo, cut into fat slices then halved
2 large ripe tomatoes, cut into bite-sized pieces
4 pimentos del piquillo, roughly chopped
1 green pepper (or sweeter yellow pepper if you prefer), cut into strips
75g fresh or frozen petit pois, or sugar snap peas
400g cooked chicken, cut into bite-sized pieces
250g paella rice (from your deli – a great store cupboard standby)
600mls good quality chicken stock, hot
100mls dry white wine
½ teaspoon finely chopped fresh thyme
Freshly ground black pepper

1 tablespoon finely chopped fresh flat-leafed parsley 

1                    Heat the olive oil in a large frying pan over a medium heat. I used a 30cm (12 inch) pan for this recipe – in a paella you are aiming to get as much rice as possible in contact with the pan. Add the onion and cook until softened without colouring (about 5 minutes). Add the crushed garlic and the chorizo and cook for a further minute. Add the tomatoes, pimientos del piquillo, green pepper, peas, chicken and rice and stir together for about a minute.

2                    Now add the hot stock, dry white wine, thyme and pepper. Stir to mix and turn down the heat to a gentle simmer. Cook until all the stock has been absorbed by the rice, the rice is tender and the mixture is no longer soupy (about 20-25 minutes). Removed from the heat and cover with a clean tea-towel for about 5 minutes before sprinkling with the fresh parsley and serving on warm plates. The sign of a good paella – whether WOW* version or the traditional version – is the socarrat – the delicious golden crust of rice at the bottom of the pan – the bit that everyone fights over.

No mountains, no sea, no tradition, but rather tasty!


Pin It

Wednesday, June 29, 2022

Courgette Soup with Mint and Lemon – how to make a glut vanish !

Pin It

At some stage over what remains of the summer, a friend will drop in with a slightly desperate look in their eye. They will ask you how you are and there will be small talk as you wait for the kettle to boil. The friend will be clutching (but studiously ignoring) a mysterious newspaper-wrapped parcel and you’ll frown and wonder if they bring it everywhere with them.

Halfway through a pot of tea, the friend will suddenly ‘remember’ the mysterious parcel and casually mumble through a mouthful of chocolate biscuit crumbs:  Oh, by the way, I brought you some courgettes, fresh from my garden.” If you haven’t got a courgette plant churning out the little blighters almost by the minute, accept gratefully and make this light, summery soup. If you have got a courgette plant, you’ll almost certainly produce a newspaper-wrapped parcel of your own as the friend takes their leave…

The friend will be clutching a mysterious newspaper-wrapped parcel...


For 3-4 servings of light summery soup you will need

25g butter (or 1 tablespoon of extra virgin olive oil)
1 large onion, finely chopped
1 teaspoon of finely grated lemon zest
500g courgettes, sliced
1 litre of well-flavoured chicken or vegetable stock
1 tablespoon of very finely chopped fresh mint

Melt the butter (or heat the olive oil) in a medium saucepan. Add the onion and lemon zest and cook gently without colouring for 8 - 10 minutes or until translucent. Add the sliced courgettes, followed by the stock. Simmer gently for about 10 minutes or until the courgette is soft.

Remove the saucepan from the heat. Add in the fresh mint and blend until you’ve turned the vegetables into a smooth liquid – a stick blender is the perfect tool for this. Taste and add salt and pepper only if necessary.

Serve it just as it is, or with a sprinkling of fresh herbs and/or a swirl of cream.


OK, that's 3 courgettes taken care of. Only another 7 to go...


...What’s your favourite recipe – savoury or sweet - for making a crop of courgettes vanish?

Pin It

Friday, May 27, 2022

White Chocolate and Cranberry Oatmeal Blondies – drizzle forecast ...

Pin It
I woke up this morning to a grey sky and a steady drizzle of rain. (If only Trump would share that trick that makes it stop raining on just him...) There is only one thing to shift me from this ill humour. Bring on the mood-enhancing white chocolate cranberry blondies...


These sweet treats are not quite as wicked as they sound. They contain oatmeal and dried fruit so that makes them practically breakfast. The recommended dosage for mood enhancement is two, with decent coffee.
The moggy isn't liking the rain either
For approximately 16 delicious ‘blondies’ you will need...
... to butter and base-line a 23cm square cake tin and to pre-heat your oven to 170°C
150g rolled oats (oatmeal flakes)
1 ½ teaspoons baking powder
100g butter
50g crunchy peanut butter
50g cream cheese
175g Demerara sugar
1 egg, beaten
1 teaspoon vanilla extract
100g white chocolate, roughly chopped
75g dried cranberries

75g white chocolate for topping (optional)

Cranberries: "We're not just for Christmas you know!"
Method
First place the rolled oats and baking powder in a food processor and blitz until you have a smooth ‘flour’.
In a separate bowl, cream together the butter, peanut butter, cream cheese and sugar, beating the mixture until light and fluffy.
Add the egg and vanilla extract and beat until well combined. Then mix in the oatmeal ‘flour’.
Finally, stir in the chopped white chocolate and cranberries. Mix until just combined.
Transfer the mixture into the prepared cake tin and bake for 30 minutes until evenly golden brown.
Remove from the oven and leave to cool slightly. Melt the remaining white chocolate and drizzle over or simply leave to cool in the tin before dusting with icing sugar and cutting into squares.
These are good slightly warm but even better if left go completely cold, so that the chocolate solidifies back into chunks. They’ll keep for up to a week (yeah right!) if sealed in an airtight container or cling wrap.


My lazy woman’s way to melt chocolate: snap the chocolate into squares and place in a Ziploc bag. Remove as much air as possible from the bag and seal. Half-fill a 1 pint measuring jug with boiling water, then carefully place the sealed bag in the water making sure the chocolate is submerged. Leave for a couple of minutes until the chocolate has melted. Remove the bag from the water and pat dry. Snip off a small corner of the bag and gently squeeze the liquid chocolate over the blondies.

Pin It