Monday, April 25, 2016

Fresh and Smoked Salmon & Leek Pithiviers – a posh word for pie!

Pin It
Pithivier - a posh word for pie!

A self-catering break can be a real challenge for a cook. Blunt knives and bockety pans are par for the course on a hired narrow boat, canal barge or holiday cottage and the kid behind the counter of the local corner shop will look at you oddly if you ask for anything out of the ordinary… pesto for instance.

Funnily enough, rather than putting me off cooking, the quest to produce something delicious using the simplest of ingredients, the most basic of tools, and a minimum of effort shakes me out of a rut. It reminds me to cook the style of food that is close to my heart - easy, quick and tasty.

Pithiviers fit the bill – a Pithivier is a posh word for a little puff pastry pie, filled with a sweet or savoury filling. I’ve gone for a fresh and smoked salmon and leek filling. They are perfect for lunch or dinner, hot or cold, and a delight on a picnic.

Here I have used ready-prepared puff pastry. If you have the will and wherewithal to rustle up perfect puff pastry from scratch in self-catering, you are a better person than I am.

For 4 little pies of puff pastry perfection you will need…

For the filling…
40g butter
175g young leeks, finely shredded
2 tablespoons mascarpone
1 tablespoon of fresh lemon juice
1 teaspoon finely grated lemon zest
½ teaspoon Dijon mustard
300g fresh salmon, diced into 1cm cubes
100g smoked salmon, shredded
1 tablespoon finely chopped fresh parsley
½ teaspoon freshly ground black pepper

For the shell…
A little plain flour for rolling out the pastry
450g all-butter puff pastry (ready-rolled is best if your kitchen utensils are limited)
1 egg beaten


Method
First melt the butter over a medium heat in a large frying pan. Add the shredded leeks and stir until coated in the melted butter. Reduce the heat, cover with a lid and cook gently without colouring for about 10 minutes. Remove from the heat and set aside to cool while you prepare the rest of the ingredients.

Put the mascarpone, and the lemon juice and zest in a large mixing bowl and give it a quick whisk with a fork. Mix in the rest of the filling ingredients (including the leeks once they are completely cool) until coated in the mascarpone. Cover and refrigerate until needed.

Mix...

Meanwhile on a work surface lightly dusted with flour, roll out the puff pastry to a thickness of a 1 euro coin - approximately 3mm. (If you are using ready rolled pastry just unfurl it.)

Cut out 4 circles approximately 12cm in diameter and 4 circles approximately 16cm in diameter. (The larger circles are the important ones from a presentation point of view so if you need to reroll any scraps to make up your circles use them for the smaller circles which will be underneath and hidden.) 

Pile...

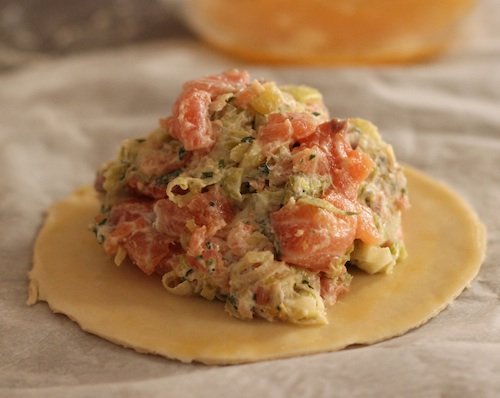
Divide the salmon mixture into 4 even portions and pile a portion in the centre of each of the smaller pastry circles, leaving a margin of about 2cm all the way around. Brush each margin with a little of the beaten egg. Cover each with a large pastry circle, pressing around the edges to ensure a good seal. Trim away any excess overlapping pastry to leave a neat edge. 


Trim...


Using a small sharp knife make a small hole in the centre of each pie to let steam escape while they cook.  It is traditional to score the surface of each pie with semi-circular lines radiating out from the centre.


Score...


Refrigerate the Pithiviers until needed.

When you are ready to bake, pre-heat the oven to 180°C (fan). Place the pies on a non-stick baking tray or one lined with baking paper and brush with beaten egg before baking in the pre-heated oven for about 25-30 minutes or until risen and golden.


Share...

Serve hot or cold with a salad.


Pin It

Thursday, March 24, 2016

Hot Cross Buns – and an Invitation to Commit Gluttony!

Pin It
Hot Cross Buns are traditionally eaten on Good Friday. These ones will lead you into temptation. 


As a child, one of the great treats of staying with my Gran in Cork City was that her local bakery produced great Hot Cross Buns at Easter. Maybe my taste buds are suffering from nostalgia, but I haven’t been able to find a bakery since that can produce a bun of comparable deliciousness. Many commercial versions taste like a mouthful of sawdust – a penance indeed. Experience has taught me that these Easter buns are a creation often best baked at home.
Easter is thought to be named after the Anglo-Saxon goddess of Spring, Eastre, and some believe this sweet spiced bread was baked in her honour. It makes much more sense to me that these sticky treats are a celebration of springtime and abundance to come rather than an invitation to commit Gluttony in the dying days of Lent. Whatever you believe, they are delicious.

For 12 tempting buns, you will need...
... to preheat the oven to 190°C at step 7

For the dough
500g strong white flour (bread flour)
1 teaspoon fine table salt
1 teaspoon ground cinnamon
1 teaspoon grated orange zest
1 sachet of dried yeast (7g)
1 tablespoon olive oil
75g ready-to-eat dried apricots, cut into small pieces (about the size of sultanas)
50g sultanas
75g honey*
300mls fresh milk
1 large egg, beaten 

a little extra olive oil for oiling the work surface and your hands for kneading

For the cross decoration
2 tablespoons plain flour
2 tablespoons water 

For the honey glaze
One tablespoon runny honey, warmed (I put it in a heatproof bowl and stand the bowl in hot water).
Remember that scene from Fried Green Tomatoes...
Put the flour, salt, ground cinnamon, orange zest, dried yeast, olive oil, dried apricots and sultanas into a large bowl. Mix to combine.

*Weigh the honey directly into a small saucepan and add the milk. Warm the milk to between 27°C - 35°C (this is when a finger dipped in the milk will feel neither hot nor cold – but best to use a thermometer).

Make a well in the centre of the flour mixture and add the beaten egg, and about half the milk. Mix with a wooden spoon or spatula and continue adding the milk until you have a soft dough and no dry flour remains. You may not need to use all the milk. Continue mixing until the fruit is well distributed throughout the dough. (You could use a stand mixer with a dough hook either.)

I am shifting more and more towards the no-knead method so I simply cover the dough with a lightly oiled sheet of cling film and leave it in a warm place to rise until doubled in size. (If you prefer, knead it by hand for about 8 minutes or in your stand mixer for about 4 minutes before covering and leaving to rise.)

After the dough has risen, turn it out onto a lightly oiled work surface, and knock it back. (This simply means giving it a couple of jabs with your fists to remove most of the air so you can form it into its final shape.) Knead lightly for a minute or so, before dividing into 12 equal portions. Roll each portion into a ball on the oiled surface, and flatten slightly into a bun shape. Line a baking tray with non-stick baking parchment and gently transfer the buns to the tray. Cover the buns with lightly oiled cling film and leave in a warm place, until once again doubled in size. Make sure the buns have plenty of room to rise.


Meanwhile, make the paste for the cross by mixing together the flour and water - you want a smooth paste with a consistency similar to porridge.

When the dough has once more doubled in size, remove the cling film. Carefully pipe the cross shape onto each bun. Transfer to the pre-heated oven and bake for 10 – 12 minutes or until golden brown. Transfer the buns to a cooling rack and immediately brush them with warmed honey.


An orange blossom honey makes the perfect glaze

It is considered good luck to share these buns and the cinnamon and orange make them particularly good with coffee so what better excuse to invite some friends over! 
Lead me not into temptation... well, perhaps just the once!
This recipe was first published in April 2012 and is back by popular demand!
Pin It

Sunday, March 13, 2016

Guinness Chocolate Cake – a piece of this is your only man!

Pin It
In true Irish style, Paddy's 'Day' 2016 is set to last 3 days. If you happen to be in Dublin, check out what's on and remember to knock up a quick batch of Guinness Chocolate Cake to keep your energy levels up.


When money's tight and hard to get
And your horse has also ran,
When all you have is a heap of debt -
A pint of plain is your only man.
(The Workman’s Friend, Brian O’Nolan)
You’ll often see visitors to Dublin with what I call “Guinness face”, poised over a glass of the black stuff, feeling that they must taste the local brew but reluctant to put their lips near something that looks like it might have been scooped from the nearby Liffey.
If you are a Guinness virgin, wait until you are in Ireland to try this beverage. Although there shouldn’t be, there is a world of difference between the flat bitter stuff I’ve been served in bars in the UK or the States and a creamy mellow jar of the stuff in its native land.
Among the many pubs that pull a decent pint of Guinness are: Johnnie Fox’s in the Dublin mountains; Kehoe’s, just off Grafton Street; Davy Byrnes, also just off Grafton Street and a stopping point for James Joyce fans; and one of my favourites, The Stag’s Head, (just off Dame Street) a tavern almost as old as Guinness, and probably as close as you’ll get to a proper traditional Irish pub -  not a shamrock or leprechaun in sight.

If you are unable to make it to the Emerald Isle to paint the town green on Paddy's Day, well then, a piece of this rich dark Guinness Chocolate Cake is your only man. 

For one tray bake (15 generous pieces) or 8 mini cakes you will need...
... to pre-heat the oven to 160
°C
Cake Batter

300g Muscovado sugar (or other dark brown sugar)
280g plain flour
40g cocoa powder, sifted
1 teaspoon baking soda, sifted
1 teaspoon baking powder, sifted
¼ teaspoon salt
250mls sunflower oil (or other flavourless cooking oil)
250mls Guinness (or other stout)
2 eggs, beaten
1 teaspoon vanilla extract 

1                    Lightly butter and base-line an 18cm x 26cm (9” x 13”) baking tin.
2                    In a large mixing bowl, combine the sugar, flour, cocoa powder, baking soda, baking powder and salt.
3                    Place the oil, Guinness, beaten eggs and vanilla extract together in a large jug and whisk to combine.
4                    Gradually add the oil mixture to the flour mixture, stirring together with a whisk until no dry mixture remains.
5                    Transfer the mixture to the baking tin and place in the preheated oven for 35 – 40 minutes until well risen. To check if it is done, lightly press the surface of the cake with your finger. If it springs back it’s done. If a small indent remains continue cooking for a further 5 minutes then test again. Alternatively, poke a cocktail stick into the centre of the cake and if it comes out clean (i.e. no damp batter clinging to it, it’s done). Remove from the oven and leave to cool in the tin.
6                    While the cake is cooling, make the frosting.  

Cream Cheese Frosting
100g full fat cream cheese
50g butter, at room temperature (i.e. soft)
350g icing sugar, sifted
1 tablespoon Guinness
½ teaspoon vanilla extract 

7       In a medium mixing bowl, beat together the butter and cream cheese until combined. Add one-third of the icing sugar and slowly beat until smoothly blended. Add in the rest of the icing sugar, the Guinness and the vanilla extract and continue beating until light and fluffy. This will take about 3 minutes.  Transfer to the cake using a spatula, or pipe in generous swirls. 

Note:  For the mini cakes shown in the photos, I carefully removed the cooled cake from the tin and stamped out 8 mini cakes using a 6cm (3”) round cutter before piping on swirls of frosting. The scraps of cake can be used for trifle or cake pops.
Sorry Brian, sometimes a cup of tea is your only man!

First published in 2012
Pin It

Saturday, February 13, 2016

Rebooting Sour Cherry Rocky Road - the Silver Lining!

Pin It
It's not Valentine's Day anymore. It has been rebooted as Generosity Day - it's the day you make Sour Cherry Rocky Road, cut it into bite-sized bits, and take it to wherever there are people you love (or simply like).


Sometimes ...  often  ... ok ... practically all the time, life doesn’t go according to plan. The road ahead usually has a few lumps and bumps lurking, ready to trip us up as soon as we cast our attention elsewhere...
... Like last month: I dropped my ice cream maker (my priceless €1 machine – maker of strawberry and rose petal ice cream); totalled my food processor (Note to self: remove the sheath from the blade before attempting to use the machine); and annihilated my electric whisk – don’t ask!  
... Like last week, when my sister Catherine made pizza from scratch... It took a detour on the way to the oven and belly-flopped onto her cat... the bad-tempered one... with the six-inch claws and the kleptomaniac tendencies (cat, not sister!). I foresee a shredded sofa and further apologies to the neighbours as the evil creature wanders home with yet another gold trinket clenched in its teeth...
... Like this morning, when a daydreaming commuter – yay, not me for a change - scurried onto an escalator clearly marked OUT OF ORDER - and stood there with an expression of utter bewilderment as he went nowhere fast and hundreds of cackling commuters sailed past him on the one that was actually working...
The good news is that life’s little wrinkles can often work out for the best. Most lumps and bumps can have a silver lining... like when I drop my heavy cookery notebook on my foot (bump, lump) and a little scrap of cardboard falls out. It’s my sister Veronica’s incredible Rocky Road recipe (silver lining).
In general I HATE marshmallow, I HATE desiccated coconut, and I’m not particularly fond of milk chocolate either. However when these ingredients get together with crunchy salty nuts and chewy sour cherries and go skinny dipping in dark chocolate, magic happens. I will happily eat this version by the kilo – leading to further lumps and bumps if indulged too often.  

Here is Veronica's original recipe...
When simple ingredients go skinny dipping in melted chocolate, magic happens!

This translates as...
300g milk chocolate (decent stuff, not cooking chocolate)
200g dark chocolate (70% cocoa solids)
90g mini marshmallows (or large marshmallows, snipped into pieces with a scissors)
80g white chocolate, roughly chopped
80g dried sour cherries (dried cranberries are good too)
75g salted jumbo peanuts
75g salted almonds
50g desiccated coconut, toasted* 

1                    First, line the base of a 30cm x 20cm baking tin with baking parchment.
2                    Then, break the milk chocolate and dark chocolate into pieces and place together in a medium heatproof bowl over a pot of barely simmering water (the base of the bowl mustn’t touch the water or the chocolate can turn grainy). Stir occasionally until melted.
3                    Add the rest of the ingredients to the melted chocolate and stir until everything is well coated. Transfer to the baking tin and leave to cool. When the chocolate is set, remove from the tin and cut into pieces - bitesized or boulders – that bit is up to you.
* I toasted the coconut in a dry frying pan over a medium heat. This task only takes a few minutes but requires a close eye because as soon as you look away, the coconut will burn in an instant.
Pin It

Monday, January 18, 2016

Homemade Burger Buns – less is more !

Pin It

For me the burger bun is too often just a bit on the side. Even when eating half decent restaurant burgers, the love seems to go into the filling and the bread is an afterthought, frequently overly sweet and cakey.  I find myself tipping the burger and the salad onto the plate and discarding the bun as just NWTC (Not Worth The Calories). At its very worst, the burger bun is something you could practically squirt soap onto and wash down the car with.

In the past, I bought some supermarket offerings as a vehicle for homemade burgers but I was really put off by the alarmingly long list of ingredients and the extraordinary shelf-life of some of the products on offer, which seemed in inverse proportion to the amount of flavour involved. More often than not they too got left on the plate and later thrown to the birds (sorry birds). Now they just get left on the shelf. If you are going to take the time and the trouble to make good burgers, then they need an equally good mode of transport to your mouth.

With a few simple ingredients and the alchemy of a little time and a little yeast, you can easily pull together a self-respecting burger bun that won’t become expensive bird food. In fact, I love these so much that I often leave out the burger and simply eat the bun!

For 8 awesome buns that won’t be left on the side, you will need…
...to pre-heat the oven to 190C before baking

450g strong white flour (bread flour)
1 x 7g sachet of dry active yeast
 teaspoons of fine table salt
1 egg at room temperature, beaten
30g runny honey
100mls warm milk (approx 38°C)
150mls warm water, (approx 38°C). Note, you may not need to use it all
2 tablespoons of extra virgin olive oil

a little beaten egg
sesame seeds (or other small edible seeds such as sunflower, poppy, or celery seeds)

Method
Combine the flour, yeast, and salt in a large bowl and add the egg. Dissolve the honey in the warm milk and add to the bowl, along with the olive oil. Mix well. Finally, add as much warm water as necessary until the dough comes together in a ball (you may not need all the water). Turn out onto a lightly floured surface and knead for about 10 minutes until smooth and elastic. Alternatively place the ingredients in a stand mixer and mix with a dough hook until smooth and elastic (about 10 minutes).
Cover with lightly oiled cling film and leave until doubled in size. (I leave it to develop overnight in the fridge for a bigger flavour but in a warm, draft-free spot, it should take about an hour and a half, or less.)


Next, turn the dough out onto a lightly-floured work surface and knead gently to deflate. Divide it into 8 even pieces – I weigh each piece, which is usually approximately 105g.


Shape each piece into a smooth, round ball. I use the ‘claw method’ for this: Using a wooden chopping board - or similar - as your work surface for this. Form a claw with your hand and trap a chunk of dough between your palm and the board. Using your fingers as a cage to stop the dough escaping, press down and rotate at the same time, moving the dough against the board until it comes together in a smooth round ball. The trick here is not to use a lot of flour. The dough needs to stick ever so slightly to the surface as you work it. When you master the method, you can do one in each hand, flying through the process like an old pro.
When you have 8 smooth, round balls of dough, lightly flour your hands and flatten the dough balls into discs, roughly 9cm (3½ inches) across.
Place the discs of dough on a lightly-floured or parchment-lined non-stick baking tray. Cover loosely with lightly oiled cling film and leave to rise in a warm place until doubled in size.


Brush the buns gently with a little beaten egg and sprinkle over pinches of sesame seeds (or other small edible seeds)


Pre-heat the oven and about a minute or two before baking, place a roasting dish on the bottom shelf of the oven and add a cupful of hot water. (The steam will help the buns rise and help create a shiny crust.)  Bake the buns on the middle shelf of the preheated oven for 12-15 minutes, or until risen and golden. Remove from the oven and place on a cooling rack.
Split across the middle when completely cold. Freeze or use within 24 hours.


You're going to need a good burger for the filling. Try the cheese and chive-filled Elvis Burger from the book, or if you fancy a veggie option, check back in a week or so (or subscribe using the box towards the top right of this page to get the recipe direct to your inbox ).

Pin It

Sunday, November 22, 2015

Orange, Cardamom & Coriander Madeleines – It's not what you've got, it's how you use it!

Pin It

For Café Europe - a cultural initiative held as part of Austria’s EU presidency in 2006 - Ireland offered scones, and France offered the Madeleine. While very different products, scones and Madeleines have some things in common – flour, sugar, butter, and social ambition. While both had relatively humble beginnings, they were adopted by high society – the scone becoming an essential part of ‘Afternoon Tea’, made fashionable by a rather peckish Anna Duchess of Bedford in the mid-nineteenth Century. The Madeleine (according to one account) was already a favourite at Versailles, adopted by the Court of Louis XV a century earlier. Both got a little lift from the invention of baking powder. There the similarity ends. Perhaps it's a lesson in "It's not what you've got, it's how you use it!"

In Remembrance of Things Past, Marcel Proust’s narrator famously has a foodgasm brought on by the Madeleine. He doesn’t mention scones.
For 24 foodgasm-inducing Madeleines you will need…
… 2 x 12-hole Madeleine tins (you’ll get away with 1, just let it cool between bakes)
150g butter
3 eggs
130g caster sugar
a teaspoon of finely grated orange zest
1 teaspoon coriander seed, finely ground
the seeds from 2 fat green cardamom pods, finely ground
¼ tsp salt
130g plain flour
¾ tsp baking powder

a little extra flour for dusting the cake tins

Icing sugar for dusting over the finished cakes


Method
In a medium saucepan, melt the butter over a medium to high heat (use a light-coloured saucepan such as stainless steel if possible as it allows you to see the colour change in the butter that indicates it has reached the right point). Once melted, let it continue to foam and splutter, swirling occasionally to make sure it is heating evenly. As the foaming and spluttering dies down, the butter will continue to darken from yellow, to golden, to toasty brown. The butter will also begin to smell a little nutty. The milk solids in the butter will separate out and sink to the bottom. Remove the pan from the hob and pour into a heatproof bowl or jug to cool to room temperature, leaving as much of the milk solid residue behind as possible (If you leave the melted butter in the pan, it will continue to cook in the residual heat and may burn).
Remove 2 tablespoons of the melted butter right away – you’ll need this to brush the cake tins later – cover and keep it at room temperature so that it remains liquid.
Put the eggs in a large bowl and add the sugar. Whisk until pale, pale yellow and has thickened to the ‘ribbon’ stage – the whisk will leave a trail as you move it through the mixture and when you lift the whisk, the batter will fall in a ribbon and stay on the surface for a couple of moments before slowly disappearing back into the mixture.


From top left to right, you can see the colour change as you whisk the batter

Add the salt, orange zest and ground spices.  Trickle in the cooled butter, whisking all the while until incorporated into the batter.
Add the baking powder to the flour and sift about one-third onto the surface of the batter. Using a metal spoon such as a dessertspoon, gently fold the flour into the batter. Repeat twice more until you have folded all the flour into the mixture.


Cover with cling film, pressing down lightly so that it is in contact with the surface of the batter.
Chill in the refrigerator for at least an hour or overnight if possible.
When ready to bake, pre-heat the oven to 180°C.
Brush the Madeleine tins lightly with the reserved melted butter and sprinkle lightly with flour, tapping off the excess. Divide the batter evenly between the tins filling no more than about three-quarters full (an ice cream scoop or piping bag is good for even portioning). Don’t bother to spread the batter out to the edges - gravity will do the work for you.


Don't bother spreading the batter to the edges - gravity will do the work for you!
Transfer to the pre-heated oven and bake for 8 to 10 minutes or until risen and golden and spring back under the touch of a finger. If the God of Madeleines has been kind, they should have formed a ‘dromedary’ hump (which I always thought was a defect, but turns out to be Madeleine perfection – who knew!). 
A ‘dromedary hump’ is desirable...
Remove from the oven and leave in the tin for a minute or so before tipping gently out of their shells onto a wire rack to cool. They freeze marvelously and are restored to oven-fresh magnificence after about 12 seconds in the microwave. If you are going to freeze them do so now, without their sugar dusting.


If they are to be eaten now, once cool, dust with icing sugar and consume with a decent cup of tea or a glass of sticky dessert wine.
You could also dip them in good dark chocolate or white chocolate.


A bit of quality control… baker's privilege ...

Pin It