Wednesday, December 10, 2014

Chocolate Orange Mincemeat – shouts Christmas louder than a chorus of drunken carollers

Pin It


For me, chocolate and orange are the two flavours that sing out louder than a chorus of drunken carollers “Christmas is Here! Christmas is Here! “ And guess what? They absolutely love each other’s company.
This year I went through my (now dog-earred) copy of The Flavour Thesaurus and picked out other flavours that adore chocolate and like to hang out with each other as well.  

Don't be put off by the list of ingredients - it's mostly an assembly job.
See? Assembly job!

For approximately 4 jars of mincemeat, you will need...
... to pre-heat the oven to 180°C   
300g sultanas
100g ready-to-eat prunes (e.g. no stone), finely chopped
100g dried sour cherries (or dried cranberries), finely chopped
300g ready-to-eat dried apricots, finely chopped
100g mixed peel (this is finely chopped candied peel of oranges and lemons)
100g walnuts, finely chopped
220g dark brown sugar
200g grated apple (I used Granny Smiths)
125g butter, cut into cubes
finely grated zest and juice of 1 large orange
finely grated zest and juice of 1 lemon
 ½ teaspoon ground cinnamon
¼ teaspoon freshly grated nutmeg (or ground nutmeg)
5 coriander seeds, crushed (or ¼ teaspoon ground coriander)
3 allspice berries, crushed (or ground allspice, but not mixed spice)
2 whole cloves, crushed
2 teaspoons cocoa powder, sifted
1 teaspoon vanilla extract
6 tablespoons Cointreau (or other orange liqueur) + an additional 2 tablespoons to stir in at the end 

Method
Mix all the ingredients together in a large oven-proof dish with a lid. Cover and place in the preheated oven and cook gently for 3 hours, stirring every half hour or so (set a timer... )

When the cooking time has elapsed, remove from the oven and allow to cool, stirring briefly every half hour until cold. This keeps the butter evenly distributed throughout the mixture.

Finally, stir the remaining 2 tablespoons of Cointreau (or other orange liqueur) into the cooled mixture before sealing in clean, dry jars.

It will keep well for up to a year in a cool dark place or in the fridge - but I can’t really see the point in that!

With these fairy-size piece, you can eat three without a hint of guilt!
For the fairy-sized mince pies in the photos, stamp out rounds of short crust pastry using a 5cm (2 inch) scone cutter and use them to line a mini-muffin tin. Fill them to the top with the cooked, cooled mixture. Bake for about 10 minutes at 180°C. 

For regular-sized mince pies, use a 7.5cm cutter (2½ inch) for the base and a 6cm cutter (2¼ inch) for the lids. Fill, seal and bake for 20 – 25 minutes at 165°C or until a pale golden brown. Remember to poke two holes in the top of each with a sharp knife to let the steam out and stop them bursting open.


I prefer my mince pies warm from the oven (the microwave is death to pastry) with a swirl of fresh cream. A touch of Cointreau in the cream is optional.

It's snowing!
Pin It

Friday, November 21, 2014

Quesadillas – hot as a temper tantrum, cheesy as furry dice

Pin It
 
One of my in-laws often transports horses and is used to dealing with shockingly impatient road behaviour and aggression as she carts her vulnerable cargo around. Over the years, she has developed a weapon which she fires at the offending driver. It envelopes them and their vehicle in a cloud of bright pink fluff, rendering them as harmless as a giant marshmallow. This all happens in her imagination but it makes her feel much better and allows her to continue on her way calmly and serenely.
I should have thought of that when a bloke in a beat up land rover approached at speed in a 30km zone and glued himself to my tail. There was so little room between our vehicles that I could practically count the spots on his furry dice. He started a hooting and a hollering and a shaking his fist.
Was there bright pink fluff? Was there calmness and serenity? Nope, I raised a very unladylike middle finger. For some strange reason that did nothing to calm him whatsoever! Though we were soon on a dual carriageway, where he could easily overtake, he stayed with me for miles, red as a beetroot (with embarrassment no doubt), bellowing out the window (what I can only assume were profuse apologies).
I had quesadillas for lunch. They were as cheesy as furry dice, laced with chilli as fiery as a temper tantrum, with a few other bits and pieces thrown like insults into the mix. I felt much better after demolishing two.
 
For each quesadilla, you will need…
1 corn tortilla
35g cheese – I used half mature cheddar, half mozzarella, grated
approximately 1 heaped tablespoon of filling, prepared before you start cooking.
 
Today’s filling was …
a little finely chopped spring onion
very finely sliced red pepper
finely sliced mushrooms
½ teaspoon of red chilli
 
You are only ever 5 minutes away from cheesy deliciousness.

Heat a non-stick frying pan over a medium heat. When the pan is hot add the tortilla and heat it through by giving it about 10 seconds, then flipping it. Do this three more times (so, 40 seconds in total).
Now scatter the filling over half the tortilla, leaving a margin of about 1cm at the edge. Cover the filling with the cheese and fold the unfilled side over to make a half moon. Cook for about 2 minutes or until golden brown, patting gently with a spatula so that both sides of the quesadilla stick together as the cheese melts. Gently turn the quesadilla and continue cooking until the second side is golden brown. Remove from the pan, cut into wedges and serve immediately. I like sour cream or guacamole with mine.
 
 
Other favourites are:
  • smoked salmon, dill, capers and cheddar
  • bacon (pre-cooked), camembert and mozzarella
  • chilli con carne, cheddar and mozzarella, and pickled jalapeños
  • prosciutto, fresh basil (or basil pesto), and mozzarella. 
Pin It

Friday, October 3, 2014

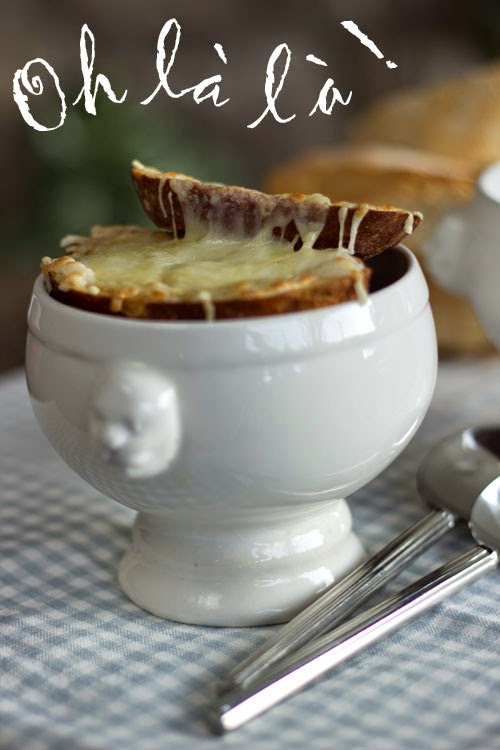
French Onion Soup – Ooh là là!

Pin It

The smell of frying onions reminds me of fairgrounds; of treasure hunting in a drizzly Camden Market; of hotdogs on a New York street corner; of the gently sizzling start of many a comforting soup, stew or casserole.  Proust, you can keep your Madeleines.

What I am after today is something even the fickle sugar rush of chocolate can’t provide. I need a bowl of no-nonsense, unapologetically pungent, solidly satisfying French onion soup with a lid of thick cheesy croutons.

Just as Ooh là là! has acquired a different meaning in English, French onion soup has come to mean an onion soup made with beef broth. However, if you can get someone to make you this dish in France, it is just as likely to be made with a chicken stock or just plain water. I’ve chosen a middle ground, going for chicken stock, as I find the beef version too ... well, too beefy. I’m in an onion sort of mood and that’s what I want this soup to sing of.

(The traditional method is to place the croutons on the soup, cover with cheese and put the whole lot under a hot grill but I find that preparing the croutons separately is quicker and safer.)

To create a little Ooh là là! for about 4 people you will need...
...for the soup
75g butter
1kg onions, peeled and sliced thinly into half moons
1L good chicken stock (or 350mls dry white wine and 650mls stock)
2 tablespoons of whiskey or brandy (optional)
a small bunch of thyme
2 or 3 bay leaves
time and patience (about 2 hours worth)
a little salt and black pepper to taste 

In a medium saucepan, melt the butter over a medium heat and add the onions. Turn down the heat and cook the onions gently until they have reduced dramatically in volume and have turned a deep caramel brown (anything up to 2 hours), stirring occasionally, particularly towards the end.

Add the stock, whiskey or brandy (if using), and the bunch of thyme and bay leaves. Cover and simmer for about 1 hour. Taste and add salt and pepper if necessary.

At this point it is ready to serve, however, I prefer to leave it cool, then chill it in the fridge overnight. I scrape off and discard any butter than has congealed on the top before reheating while I make the croutons.
Transform the humble onion into a pot of gold
 
 
... for the croutons
8 slices of baguette, about 1.5cm thick
1 clove garlic, peeled
100g Gruyere (or a mixture of Gruyere and Mozzarella) grated

Place the slices of baguette on a baking tray and bake at about 175°C for about 15 minutes or until golden, turning once about half way through the time. Leave to cool.

When the soup is ready to serve, rub the croutons lightly with the clove of garlic, place on a baking tray and sprinkle with the grated cheese. Place under a hot grill until golden and bubbling.

Ladle the soup into bowls and launch two croutons on the surface of each golden oniony sea. Serve immediately. Ooh là là !
Ooh là là !

Pin It

Tuesday, September 9, 2014

Coffee and Honey Granita - I've got chills... they're multiplying...

Pin It


If you are cooking with wine, the rule is, make it, at the very least, one you would happily sip. The same is true for coffee, and when coffee is the star ingredient I like it to have a bit of personality.
Heathen that I am, I don’t have a proper grinder so I used my blender – not processor – to crush the single origin specialty roasted coffee beans sent to me by Hancock & Abberton. I used a caffetiere/French press to brew the resultant medium ‘grind’ (you may remember, I blew up my coffee machine...)

This Mexican coffee from Finca Muxbal, which stands on the slopes of the active Tacana volcano on the border with Guatemala, is billed as having “flavours of peaches, cream and sweet honey complemented by an exceptionally clean finish”. There was a fruitiness that may or may not have been peaches and I couldn’t detect the cream but there was rich sweetness to it. It was very smooth and the advertised ‘clean finish’ was there - perfect to round off a meal.
I'd originally planned to flavour the granita with Baileys. However, having tasted the coffee, I ditched the booze. There is enough going on in this cup o’ Joe to let it stand on its own two feet! It is best to end a lunch rather than a dinner with this dessert - unless you want your guests wide awake for the night.

For the lightest, simplest dessert imaginable, you will need...
500mls strong coffee, freshly brewed (I used double-strength)
90g runny honey (I used a light floral honey)

 To serve (optional)
Whipped cream
Finely chopped toasted walnuts or finely shredded lemon zest

 Method

Add the honey to the hot coffee and stir until dissolved. Pour into a shallow freezer-proof container with a lid. Leave to cool to room temperature. Cover and chill before transferring to the freezer. Set a timer for an hour then remove from the freezer and beat the mixture with a whisk or fork to break up the crystals that are starting to form. Replace in the freezer. Reset the timer and repeat the beating process. Repeat every hour until you have a coffee snow (it took me 5 hours but the actual work only takes a few minutes). Leave the lid off the container for another hour after the final whisking to let any excess liquid evaporate. That’s it! Granita done! Covered, it stores well in the freezer.
The 'puddle' stage... (I've got chills...)
 
The 'slush' stage... (They're multiplying...)
 
The 'perfect for skiing on' stage, and ready to eat  (You're the one that I want!)
 
To serve, fluff up the granita with a fork and scoop a portion about the size of an espresso into a pretty glass or cup. At this point it is a stunning, no fat dessert.
Throw caution to the wind and top with a little cream, and some chopped toasted walnuts or shredded lemon zest (delicious with this coffee snow), or both. You could add a little liqueur to the cream if you fancied it – Baileys, Tia Maria or Kahlua all work.


(Ooh, ooh, ooh, honey!)
 
Disclosure: These are my personal views. I have not received any compensation from, nor have I any material connection with, the brands, products, or services I have mentioned.

Pin It

Monday, August 4, 2014

Maple French Toast Sticks – it’s an emergency !

Pin It
I’ve always had a vague desire for a swimming pool and on Saturday morning, the gods granted my wish. I should have been more specific with my daydream as the pool was rather inconveniently located in the sitting room.  
 
Two plumbers later, there was a gaping hole in the floor and the need to call out an electrician to fix the cable they’d severed in the hunt for the leaking pipe which they were chasing rather alarmingly with a pneumatic drill. I left them to it and escaped to the supermarket.

Returning home, the car boot popped open and spread half the groceries down the road. Argh! Two girls stopped short of running over my scattered purchases and put their hazard lights on, allowing me to collect up my bits and pieces. The runaway groceries were a little battered and dented but the only real casualties were the beer (which was gushing spectacularly from several cans) and the roasted red peppers which had been destined for great things but which had smashed at the bottom of a bag and subsequently leaked oil all over the inside of the car. Oh you gods are capricious!

Back at the ranch, both water and electricity had been restored and although it was way past breakfast time, it is never too late for brunch. It had to be quick. It had to be easy. It had to make my day a whole lot better.

There was nothing else for it – I needed an emergency batch of Maple French Toast Sticks, and quickly.

Look Inside the preview of Alchemy – a Cookbook on Amazon for this quick, easy, make-your-day-a-whole-lot-better recipe.
And don't forget the icing sugar!
 
 
Pin It

Wednesday, July 23, 2014

Alchemy - A Cookbook... out now on Kindle Store

Pin It Whooops! I’ve let the 4th anniversary of Alchemy slide by, but I’ve been a little busy putting the finishing touches to Alchemy – A Cookbook, which is now available from the Kindle Store on Amazon.
Hester Casey, Alchemy - A Cookbook - buy it now on Amazon.com


Like the blog, the book is bursting with easy-to-follow recipes to help you turn simple ingredients into magical food.

Try Maple French Toast Sticks for a lazy brunch. Magic up a delicious, nutritious and ridiculously low fat ‘Some Like It Hot’ Courgette Vichyssoise, excellent with the ‘Frankly My Dear’ Bacon and Jalapeño Cornbread.  Fill your kitchen with the enticing aromas of Controversial Irish Stew, and win hearts with Chicken with Cointreau Cream.  Dive straight into dessert with a classic Bakewell Tart, the sinful Sour Cherry and Vanilla Wellington Squares or the light and delightful Pears in Cardamom and Chardonnay Syrup and lots, lots more.
 
BUY the book today from the Amazon Kindle Store and create a little magic in your own kitchen.
Then share the magic once you’ve got your copy, tell a good friend about it.

https://twitter.com/intent/tweet?text=I'm+turning+simple+ingredients+into+magical+food+with+ALCHEMY+-+A+COOKBOOK+-+get+yours+from+Amazon+now%20http://amzn.to/1ubwjh5  Alchemy - A Cookbook https://www.linkedin.com/shareArticle?url=http%3A%2F%2Fwww%2Ealchemyinthekitchen%2Eie%2F2014%2F07%2Falchemy-cookbook-out-now-on-kindle-store%2Ehtml&mini=true
Don’t have a Kindle? Don’t need one! Read Alchemy – A Cookbook on your Android phone or tablet, iPad, iPhone, Mac, Windows 8 PC or tablet.
Get the free app via Amazon
Pin It

Tuesday, May 13, 2014

Almond, Orange and Apricot Buttermilk Scones – Would it be rude to eat three?

Pin It


The scone, so beloved of the British Isles, is thought to be about a thousand years old. There is a town in Scotland called Scone. It is tempting to believe that that's where the scone got its name from but there are other contenders from as far afield as Germany and The Netherlands.
The scone as we know it can only date from the mid 19th century with the appearance of baking powder and baking soda. These culinary equivalents of the Wonderbra gave what must have been quite a flat and boring mass a bit of a lift. Since then, the scone hasn’t looked back and no teashop worth its salt would be without this stalwart of Afternoon Tea (or breakfast, or anytime with a cuppa really).

I’m not crazy about sultana scones and one of my young nieces shares this foible. If she gets a sultana scone, she picks out all the fruit, saving the ‘good’ plump sultanas for a better life (!!!) and eating the ‘bad’ smaller ones before demolishing the denuded quick bread.
I prefer more interesting fruit in my scones and I’ve gone with a buttermilk version simply because, for the first time in my life, I’ve run out of baking powder. The result is Almond, Orange and Apricot Buttermilk Scones. My taste tester said “Mmmmmmmmmmmmm!!! Would it be rude to eat three?” Of course not!

For approximately 10 dainty (5cm) scones you’ll need...
... to pre-heat your oven to 190°C 

250g plain flour
½ teaspoon bicarbonate of soda (bread soda)
½ teaspoon ground cinnamon
¼ teaspoon salt
the zest of an orange, finely grated
50g butter, cold from the fridge, cut into small pieces
30g honey (or caster sugar if you prefer)
1 egg yolk
110mls buttermilk* (approximately)
½ teaspoon almond extract
50g ready-to-eat dried apricots, snipped into sultana-sized pieces

Method 

In a mixing bowl, combine the flour, bicarbonate of soda, cinnamon, salt and orange zest.

 
Add the butter, and “rub it in” to the flour by taking large pinches of the mixture and crumbling between your fingertips until it resembles fine breadcrumbs. Add the honey (I weigh it directly into the bowl).

Grate! I love orange zest!
 
Combine the egg yolk with the buttermilk and almond extract and add just enough of this mixture to the flour mixture so that there is no dry flour left (you may not need to add it all).
Finally mix in the apricot pieces and turn the dough onto a lightly-floured work surface. (The dough can quickly be prepared in a stand mixer too.)
Handle the dough as little as possible to keep the butter cold for a better rise. Knead very lightly then pat the dough out into a round of about 2cm high. Stamp into rounds using a lightly floured 5cm scone cutter. (Try to avoid twisting as you stamp out the rounds as this will cause them to rise unevenly, like mine... old habits die hard). Gather up any scraps, re-form into a round and continue stamping out scone shapes until you’ve used up the dough.
Place on a non-stick baking sheet and brush with a little beaten egg or milk to glaze. Bake in the pre-heated oven for 12-14 minutes or until well risen and golden brown.

Oven-ready in about 5 minutes flat! Tummy-ready in about 20!
 
Serve warm with butter and/or jam and a decent cup of tea or coffee - best served on the day of baking but can be frozen and refreshed in a hot oven. Cherry jam goes fantastically well with these. 

Rude to eat three? Why, it's practically mandatory!
 
Tip:
* If you don’t have buttermilk, use whole milk and add a generous squeeze of fresh lemon juice.


This recipe can easily be increased. Double everything except the cooking time.
Pin It

Friday, April 25, 2014

Ginger Nuts – to dunk or not to dunk, that is the question ...

Pin It

Dunk (verb) to dip (bread or other food) into a drink or soup before eating it.
"I dunked a biscuit into the cup of scalding tea"

Blasphemous” talk about HRH - or any British royal for that matter; mobile phone use; slouching; or resting your elbows on the table are all behaviours likely to get you into trouble in a controversial Brighton tearooms. Conversation shouldn’t be more than “two tones above the chink of a teacup” – somewhat hard to measure as teacup-chinking and teaspoon-clinking are also frowned upon. Under NO circumstances drink from the saucer- you could be sent to the Tower.

The Tea Cosy has also prohibited dunking. Engaging in the “unsavoury habit ... will result in you being asked to leave”.

Unsavoury habit? Really? Dunking is an art that has been practiced for aeons. Would The Tea Cosy have evicted Proust for executing one of the most famous literary dunks in history—a madeleine dipped in tea?

We learn to dunk early. For centuries, children have known the pleasures of dunking toast soldiers into the molten centre of a soft-boiled egg. With the arrival of tea, coffee and hot chocolate, dunking has become much more skilled.

According to research from the University of Bristol, dunking a biscuit releases up to ten times more flavour than a dry biscuit. A successful dunk is when the biscuit absorbs enough liquid to release all that extra flavour but not so much that the sugar melts and the structural integrity of the biscuit fails, leaving biscuit-y sludge at the bottom of your cup.

Factors that have to be taken into account are:

Temperature—the hotter the liquid, the faster the sugar melts.

Angle—this is more important with chocolate biscuits and a very shallow angle, chocolate-side-up, is advised as the chocolate provides support. For all others, a 90° angle was found to be better.

Length of timeJammie Dodgers and Rich Tea have considerable staying power—able to withstand a 20-second dunk. Digestives, Hobnobs and Ginger Nuts will start to dissolve after just 2.92 seconds.

I don’t mind the Ginger Nut’s lack of staying power. There is an alchemy in the combination of strong, hot tea (particularly Assam) and the spicy heat released by the biscuit that makes this combination greater than the sum of its parts.

For about 30 biscuits (cookies), you will need...
150g caster sugar (or dark brown sugar)
125g butter
50g black treacle
50g golden syrup
1 small egg
1 teaspoon vanilla extract
10g mixed peel (or candied orange peel) very finely chopped (optional)
10g preserved ginger in syrup, very finely chopped (optional)
325g plain flour
1 tablespoon ground ginger
1 teaspoon ground cinnamon
3 allspice berries, crushed to a fine powder (or ¼ teaspoon of ground allspice)
½ teaspoon bicarbonate of soda
½ teaspoon baking powder
¼ teaspoon salt 

Extra caster sugar for rolling the cookie dough in before baking

Method 

Place the sugar, butter, treacle, and golden syrup in a bowl and beat until paler in colour and lighter in texture. 

Continue beating while you add the egg and vanilla extract (along with the mixed peel and preserved ginger if using). Beat until combined. 

Mix together the flour, ground ginger, cinnamon, allspice, bicarbonate of soda, baking powder and salt and add to the mixture in the bowl, beating all the while. 

Pre-heat the oven to 160°C and line 2 or 3 baking sheets (depending on how big your oven is) with non-stick baking parchment.  

Rinse your hands with cold water and shake off any excess moisture. This will help stop the dough sticking too much. Pinch off walnut-sized pieces of dough and form them into balls. Dip the balls in the extra sugar (this gives them a lovely sparkle) before placing on the baking sheets, at least 5cm apart to give them room to spread out. There's no need to flatten them - the heat will do all the work.

No need to flatten them out - the heat will do all the work

Bake in the pre-heated oven for about 17 minutes. At 15 minutes they are cooked but a little chewy. I always remove one tray of the cookies at this point because I like this chewiness, but they are ginger nuts which are supposed to be crunchy so I let the rest cook to full crunchiness.

Shush! Don't tell anyone or we'll be thrown out.
To dunk or not to dunk - that is a question of personal taste. But if you don’t, you won’t know what you’re missing.
Pin It