Monday, December 31, 2012

Spaghetti with Clams - a rollercoaster ride!

Pin It
Happy New Year, tastebuds!
I’ve come across Spaghetti alle Vongole - spaghetti with clams - many times in many novels as the one dish the busy heroine or hunky hero can manage to throw together however undomesticated they are. 

Light but luxurious, comforting but with a chilli kick, I first tasted this dish in Venice where my taste buds thought they had died and gone to pasta heaven. It is a bowlful of loveliness that is greater than the sum of its parts and takes longer to describe than it does to make. Right now, it answers my craving for lighter food after the excesses of Christmas.

You’ll need a large frying pan with a lid, and with this dish, timing is everything so make sure to have everything prepared in advance as once the pan goes on the heat it is a bit of a rollercoaster ride to the plate.


To send two sets of taste buds to heaven you will need…

150g dried spaghetti
3 tablespoons extra virgin olive oil
3 tablespoons finely chopped celery stick
1 tablespoon finely chopped celery leaf (if available)
2 fat cloves of garlic, very finely chopped
1 fresh red chilli, very finely chopped
2 fresh (ripe) tomatoes (plum tomatoes if possible), diced
500g fresh clams, rinsed in several changes of cold water to remove any grit
150mls dry white wine
a little sea salt and freshly ground black pepper
2 tablespoons finely chopped fresh flat-leafed parsley


Fast food!


1.                 First start to cook the spaghetti according to the instructions on the pack. Working backwards, you want to start the sauce 5 minutes before the spaghetti is cooked.
2.                 In the frying pan, heat the olive oil over a medium heat. Add the chopped celery stick (and celery leaf if using), along with the garlic and chilli. Cook for about a minute or until the garlic just begins to take on a golden tinge. Now add the tomatoes, cooking for a further minute.
3.                 Turn up the heat and add the clams and white wine, covering the pan with the lid. Shake the pan back and forth occasionally to make sure the clams are cooking evenly in the fragrant liquid and steam. They will take about 3 minutes to cook - once they are cooked they will spring open. Turn off the heat and discard any clams that haven’t opened.
4.                 Meanwhile, the spaghetti should be ready. (Test it to make sure it is not too chewy - if it is, give it another minute and test again). Drain and add to the frying pan along with the chopped parsley. Using two forks, toss the spaghetti in the clam sauce. Taste and add salt and black pepper only if necessary. Allow the spaghetti to absorb some of the delicious juices for a minute or so before serving in warm pasta bowls.
5.              Sigh contentedly.

Right, that’s it from me for 2012. Wishing you and yours the happiest New Year, full of wonderful things. See you in 2013!

Hester x


Pin It

Saturday, December 22, 2012

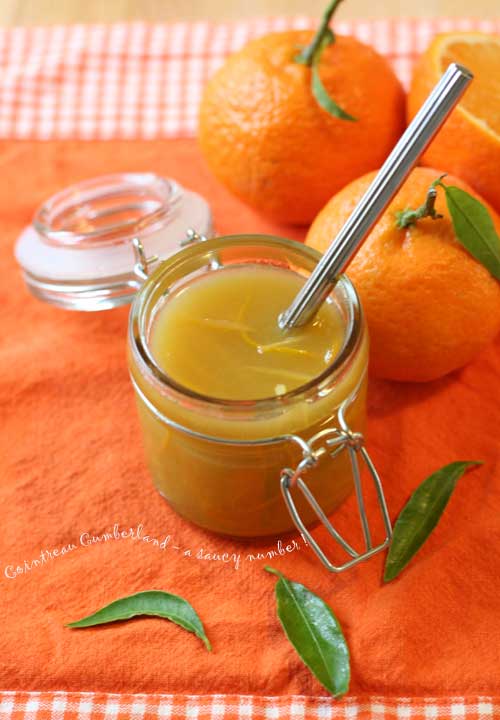
Cointreau Cumberland – a saucy little number !

Pin It  
It’s funny how Cumberland Sauce has ended up being a quintessentially English sauce when it has its roots in Germany – a bit like the royal family, you might say.
Traditionally, it comprises port and redcurrant jelly with a few other bits and pieces - ground ginger, powdered mustard etc. It should be thin, and sweet-ish, a pretty ruby colour with the gentle kick of a retired can-can dancer.
Let’s go with the dancer analogy: If I was a critic watching this sauce prance around the kitchen I would scribble the following notes:
A little too thin to carry the role... a touch too sweet... needs more attack...
Thicker than the traditional sauce - and golden rather than ruby - this saucy little Cointreau-laced number is more than able to high-kick its way across your taste buds and is well able to stand up to rich pâtés or terrines. (It is also delicious with the inevitable cold turkey and ham.)

For a sauce with more attitude you will need...

1 lemon
1 large orange
200g plum jam (or similar flavour, not too dominant)
4 tablespoons Cointreau (or other orange liqueur)
10g fresh ginger, thinly sliced
1 teaspoon fresh lemon juice
100mls fresh orange juice
1 teaspoon Dijon mustard  


1.           First, using a vegetable peeler, thinly peel the zest from the lemon and the orange, leaving as much of the white pith behind. Trim the peelings with a sharp knife to remove any of this bitter pith that still clings to the zest. Cut the peel into 4cm lengths trimming the edges so they are straight (this looks nicer in the finished sauce). You can discard the uneven trimmings. Cut the strips of zest into the thinnest shreds you can manage. Put them in a small bowl and cover with boiling water to soften the flavour.
2.           While the zest is soaking, place the plum jam in a small saucepan, with the Cointreau, ginger, lemon juice and orange juice. Heat gently until simmering and allow to bubble gently for about 8 minutes, stirring occasionally. This will help evaporate some of the alcohol.
3.           Pass the sauce through a strainer to remove the ginger and any fruity pulp from the jam and fruit juices. Taking a little of the strained sauce, added it to the mustard, mixing until smooth. Return this mixture to the sauce. Drain the shredded zest and pat with kitchen paper to remove any excess water before adding to the sauce. Leave to cool. 

I particulary love this sauce with this ridiculously easy chicken liver pâté.
Pin It

Sunday, November 4, 2012

Apricot and Almond Scones – easy, lazy, delicious !

Pin It


I’m a brunch kinda gal. I’d rather skip breakfast than breakfast in a hurry so my cupboards are usually bare of boxed cereals (unless specifically bought for a recipe). So when my nieces and nephew come for a sleepover, there is usually a mad scramble to find hungry tummies something to eat in the morning. Luckily they are used to this routine by now and know that empty cupboard breakfasts can produce French toast (in about 20 minutes); buttermilk pancakes, (about the same); and that scones, while taking just a bit longer, are a fun hands-on activity, and open to all sorts of flavour customisation: apple... nutella... chocolate chip...
My latest favourite is Apricot and Almond. This mixture is easy, lazy, and delicious. Kids (of all ages) love to get involved in cutting out and glazing.  Guaranteed a big hit with little and large tummies alike.

For 8 or 9 scones you will need...
... to preheat the oven to 200
°C
150g plain flour
75g wholemeal flour
50g ground almonds
10g baking powder
¼ teaspoon fine table salt
50g butter, cut into small cubes
100g ready-to-eat dried apricots, very finely chopped
½ teaspoon almond extract (optional)
150mls fresh milk 

To glaze
1 egg, beaten (or a little milk for a less glossy finish)
a little brown or white sugar for sprinkling  

1                    Place the white flour, wholemeal flour, baking powder, ground almonds and salt in a mixing bowl. Add the butter and rub it into the flour, lifting and crumbling the mixture between your index and middle fingers and your thumbs, until it resembles fine breadcrumbs.
2                    Add the chopped dried apricots.
3                    Mix the almond extract (if using) with the milk, and pour into the bowl. Mix gently until the ingredients have formed a soft dough and no dry flour remains.
4                    Lightly flour your hands then turn the mixture onto a lightly floured work surface. Knead gently to form a ball. Pat the dough out into a round approximately 2cm thick (you could use a rolling pin for a more professional finish but I’ve found that hungry kids don’t much care for perfect symmetry).
5                    Using a 6cm (3”) cutter, stamp out scone shapes from the dough reforming any scraps into a ball and once again patting into a thickness of 2cm. This mixture yields between 8 and 9 scones.
6                    Place the prepared scones on a non-stick baking sheet and brush the tops with beaten egg. Sprinkle each with a pinch of sugar and bake in the preheated oven for 12 – 15 minutes until risen and golden brown.
7                    When cooked, remove from the oven and place on a cooling rack for about 5 minutes before serving with butter and jam. Scones are best served the day they are made but generally there are no leftovers so this won’t be a cause for concern J


Note: You could use your food processor for the first 2 steps, using whole almonds for better flavour and simply roughly chop the apricots, letting the processor do most of the work. I prefer to mix in the milk by hand as overworking the dough can make it tough.

It's called the fastest bread in the West because one moment it's there and next it's scone ...
 
Pin It

Sunday, October 21, 2012

Roasted Vegetable Tart Tatin – lives up to its puff pastry potential...

Pin It

I was watching The Great British Bake Off the other evening and the overriding theme was a terror of soggy bottoms. They went on about it so much I began to wonder if the judges and contestants had each had a childhood filled with compulsory picnics on damp grass without the benefit of a ground sheet.
It turns out that the dread lay in the possibility of puff pastry not reaching its full airy potential. Oh the drama of it all!
And yet, as I prepared this roasted vegetable tatin, I too began to worry about stunting the growth of my puff pastry. Ripe juicy tomatoes, plump peppers – all that juice instead of spelling flavour, now just signalled certain disaster. There was nothing for it but to roast the bejaysus (technical term) out of the vegetables before they came anywhere near the pastry. The benefit of roasting the vegetables in advance is that it concentrates the flavour no end as well as driving out those potentially catastrophic juices.
War On Waste: Because this is cooked in two stages, you could pop the vegetables in to the oven with another dish and finish the tart the next day, or you could cook something else in the oven while the vegetables are cooling (This is what I did, making this banana bread - with walnuts instead of coconut)– WOW is about energy efficiency too.
 
For 1 savoury tarte tatin you will need...
... to preheat the oven to 180
°C


4 tablespoons extra virgin olive oil
4 medium tomatoes (about the side of a tennis ball), halved across the waist
4 small bell peppers (again, think tennis ball), halved top to bottom, seeds removed
2 onions (yep, tennis ball), peeled, leaving the root intact, then sliced into 4 wedges through the root
1 fat clove of garlic, grated
½ teaspoon dried basil
Salt and freshly ground pepper to taste

1 x 250g ready-rolled puff pastry sheet 

Fresh basil, parsley or mint leaves to garnish 

1                    Put the olive oil into a medium roasting tin and add the prepared vegetables. Dot with grated garlic and sprinkle with the dried basil, salt and pepper. Roast in the preheated oven for about 30 minutes, or until the edges of the vegetables start to brown. Remove and leave to cool.
2                    Line an 22cm (9”) round cake tin with parchment paper (this stops the vegetables sticking)
3                    Pack the cooled roasted vegetables snugly into the cake tin in one layer, bearing in mind that you’ll be inverting it to serve, so best side down...
4                    Cut the pastry sheet to fit neatly over the top of the tin. Place on top of the vegetable layer and transfer to the preheated oven.
5                    Bake for about 30 minutes (again in a preheated oven at 180°C) or until the pastry is golden and risen. Leave to cool for about 10 minutes before carefully inverting onto a serving plate. Scatter with fresh basil, parsley or mint leaves. 

Note: Although this tart didn’t hang about long enough to get a soggy bottom, I suspect that the juices would leak into the pastry by the following day so feed this to a hungry appreciative crowd who will demolish it before it has time to disgrace you.
Pin It

Tuesday, September 18, 2012

Roasted Panzanella with Lemon and Caper Dressing - almost too good to be true!

Pin It
 
This week has been almost too good to be true. According to my email, I am the beneficiary of several generous inheritances – mostly from people I’ve never heard of in Nigeria and South America.
Some random investor in China is prepared to lend me buckets of cash with no collateral required. Meanwhile, though I cannot for the life of me remember buying a ticket, it appears I have also won the Italian state lottery this week, so I won’t need to take Mr Wong up on his generous offer.
I am feeling quite overwhelmed by these riches that are – apparently – coming my way. Don't worry, I’m not going to lose the run of myself. Until the cash actually arrives, I will continue to live a simple life.
With that in mind, I have stoked up a hunger for simple, peasant food. Panzanella springs to mind. It is a thrifty Italian salad mainly of tomato, and yesterday’s bread. I’ve added roasted vegetables for punchier flavour and a more substantial dish. The dressing is inspired by my caper-hating sister-in-law, Rosie, who recently made the most incredibly delicious caper-laced, lemony tapenade.
To serve 4 as a main, or 6 – 8 as a side you will need...
... to pre-heat the oven to 180
°C

For the roasted vegetables
1 red onion, peeled, leaving the root intact
1 large red pepper, cut into large pieces
200g courgettes, cut into 2cm cubes
400g fresh tomatoes (a variety of different types if possible) cut into large chunks
2 tablespoons extra virgin olive oil
¼ teaspoon sea salt
¼ teaspoon freshly ground black pepper 

1                    First cut the red onion into 8 wedges, making sure each wedge gets a share of the root (this helps keep the onion pieces whole during cooking).
2                    Mix gently with the rest of the ingredients until coated in olive oil. Transfer to a shallow baking tray, spreading the vegetables out as much as possible so that they roast evenly. Roast in the pre-heated oven for 30 minutes or until they start to blacken at the edges. Leave to cool in the baking tray. While the vegetables are cooking, make the croutons

For the croutons
3 tablespoons extra virgin olive oil
1 clove garlic, crushed
¼ teaspoon Herbes de Provence (or dried basil)
¼ teaspoon sea salt
125g white country bread, ciabatta or baguette, cut into bite-sized cubes 

3                    Mix the first four ingredients together in a medium mixing bowl. Add the cubes of bread and turning them in the garlicky oil until it has been absorbed and the cubes are coated evenly.
4                    Transfer to a shallow baking tray and bake in the pre-heated oven for 5 minutes or until lightly golden brown. Turn the croutons over and replace in the oven for a further 2 minutes. (Set a timer as they go from golden to charcoal in no time). Leave to cool on the baking tray. 
 
Simple ingredients, magical food...
 
For the lemon and caper dressing
4 tablespoons sunflower oil (or other light flavourless oil)
2 tablespoons extra virgin olive oil
2 tablespoons freshly squeezed lemon juice (if you don’t have fresh juice, use white wine vinegar instead)
1 heaped teaspoon capers, rinsed to remove any vinegar or salt, then very finely chopped
½ clove garlic, crushed
¼ teaspoon salt
 
5                    Place all the dressing ingredients in my Super Salad Shaker (a.k.a. a jam jar with a lid), seal tightly and shake until combined. Couldn’t be simpler.
 
Seal tightly to avoid dressing the kitchen and self in delicious lemony dressing...

To assemble the salad...
 
While the vegetables and croutons are cooling you will need...
200g fresh tomatoes, cut into bite-sized chunks
150g cucumber, skin on, cut into bite-sized chunks
12 fat black olives, stones removed
Fresh basil 

6                    Place the tomatoes, cucumber and olives in a large serving bowl or platter.
7                    When the roasted vegetables and croutons have cooled, add them to the serving dish along with approximately 12 basil leaves and spoon most of the dressing over, turning the contents of the dish gently to coat them evenly with the dressing. Cover and leave in a cool place (but not the fridge unless you want woolly-textured tomatoes) for at least 30 minutes for the flavours to meld (alchemy at work!) or up to 12 hours. 

I feel a picnic coming on...
 
Taste-tester verdict:
Pin It

Monday, August 27, 2012

Honey Vanilla Oatcakes – oh lord it's so hard to be humble...

Pin It
Oh lord, it's so hard to be humble...

Himself is but a man of simple tastes. Not for him the lure of double chocolate, chocolate chip anything. His ice cream of choice is vanilla; his cheese, mousetrap (aka Cheddar); his biscuits, humble (“plain, cheap, unsophisticated” biscuits such as rich tea, digestives etc).
Unfortunately for him, humble isn’t a word that exists in my kitchen vocabulary. The only time anything resembling a humble biscuit appears is when it’s going to be mixed with half a pound of melted butter and smothered in 3 inches of cheesecake.   
Reluctantly I agreed to a request for homemade humble biscuits and they started off pretty well… oatmeal… wholemeal flour… salt… all pretty humble ingredients. But then I *accidentally* shovelled in a load of butter and honey and a hint of vanilla. Good with a cuppa, these are excellent slathered with fresh goats cheese or Philly.

For about 20 oatcakes you will need…
… to preheat the oven to 180˚C

180g oat flakes
120g plain flour
60g wholemeal flour
1 teaspoon baking powder
½ teaspoon coarse sea salt
200g butter
100g runny honey
½ teaspoon vanilla extract

1.             In a large mixing bowl, mix together the oat flakes, plain and wholemeal flours, baking powder and salt.
2.             Place the butter, honey and vanilla extract in a medium saucepan over a low heat until melted together.
3.             Let the butter mixture cool before adding it to the other ingredients. Stir until the mixture comes together in a ball. Chill in the fridge for about half an hour – this makes the dough easier to handle.
4.             Roll out on a lightly floured surface (or between two sheets of cling film) to a thickness of about 3mm and cut into rounds (or flowers as I have done) with a cookie cutter. Re-roll any offcuts.
5.             Carefully transfer the oatcakes to a baking sheet leaving a few centimetres between each so that they bake evenly. Bake in the preheated oven for 15 – 20 minutes or until golden brown. Transfer to a cooling rack. When completely cold, store in an airtight container. 

 
Note: these make a delicious crumb base for my smoothie cheesecake (see I told you I couldn’t do humble!)
Pin It

Tuesday, August 14, 2012

Tattie Pot – reet good Geordie grub, lamb!

Pin It
Tattie Pot - reet good Geordie grub, lamb!

 
Last year my beloved was reunited with several old friends from his scouting days. It was a hectic weekend as the lads had several decades to catch up on. We returned to spend a more relaxing few days with our wonderful hosts from that weekend, Chris and Anne, who are justly proud of the fabulous countryside near their home in Northumberland.

One magical place we visited was Long Meg stone circle just over the border in Cumberland. You can’t visit the circle without popping in to The Watermill, an organic flour mill at nearby Little Salkeld.  It has a café and shop attached and does a great cuppa to wash down its wonderful scones and bread.  If you have a spare £850,000 lying about you might be interested to know it is for sale.


Buy this hen for £850,000 and get a free organic flour mill :)


If, on the other hand, you’d be hard pushed to rub £8.50 together here’s a meal that won't break the bank. This recipe came to Anne, via her friend Norma from her student days near Newcastle. It is reet good Geordie grub. It was designed to feed a family on thru’pence and was just what we needed after a day’s exploring.

You’ll need to chat to your local craft butcher to get lap of lamb but it is worth seeking out.

To feed 4 hungry people you will need…
… to preheat the oven to 180˚C

3 onions
4 carrots
4 large old potatoes
50g butter

½ teaspoon salt
750mls boiling water
1kg lap of lamb

1.                              Peel all the vegetables and cut into slices about 1cm thick.
2.                              Melt the butter in a large frying pan and add the slices of onion, trying to keep them as whole as possible. Fry gently until the onion begins to turn golden brown (about 5 – 8 minutes). Transfer to a casserole dish so that the onion is in one layer.
3.                              Scatter the carrots over the onions then arrange the potato slices in a layer over the carrots. Sprinkle the salt over the vegetables.
4.                              Carefully add enough of the boiling water to come halfway up the layer of vegetables – you may not need it all.
5.                              Sit the lap of lamb on top of the vegetables - skin side up. Transfer to the pre-heated oven and bake for 90 minutes. The meat should be crisp on top and almost falling to pieces and the potatoes should be golden on top.
6.                              Serve immediately and wonder how on earth something so simple can be sooooooo good.

Pin It