Showing posts with label Bread. Show all posts

Thursday, April 6, 2023

Honey-glazed Cranberry and Apricot Hot Cross Buns - Sinful!

Pin It

Yikes! Nearly forgot to make Hot Cross Buns. I've made several versions, but these are still my favourites. You still have time to make them for tomorrow!


Hot Cross Buns, Hot Cross Buns, One a Penny, Two a Penny, Hot Cross Buns

Hot Cross Buns have been a part of Easter for a very long time (how long depends on what version of history you believe - but they may have originated in the 14th Century or even earlier). They would originally have been plainer, as dairy products were forbidden to Christians during Lent, and the Mixed Spice would have been hugely expensive, and anyway, wasn't in common use until the early to mid-19th Century. Here, they have been updated further with the addition of a Tangzhong roux which helps lock in moisture and keeps these buns deliciously light and fresh. 

This recipe may seem long, but no step has actual ‘hands on’ time of more than a few minutes and I think the result is worth the effort. Read the entire recipe first to make sure you have all the ingredients, and complete the steps in the order given. I recommend a stand mixer with a dough hook for this as it is quite a sticky dough to begin with, but if you do it by hand, you’ll have worked off enough calories to eat more than your fair share J

In essence, the steps are: make Tangzhong roux; make dough; make paste for cross; bake; brush with warm honey; eat with a good cuppa


Hot and Cross? Anything but!

Ok, here goes…

For 18 - 24 sinfully sticky buns, you will need...
... to preheat the oven to 180°C when ready to bake

For the Tangzhong roux
40g strong white flour (bread flour)
200mls water

Mix the two ingredients together in a small saucepan, slowly whisking in the water to create a lump-free liquid. Place over a medium heat and stir until the mixture begins to thicken. Continue cooking for another minute or so until you have a thick, creamy almost translucent paste. Remove from the heat and leave to cool to room temperature.

__________________________________

For the dough
50g ready-to-eat dried apricots, cut into small pieces (about the size of sultanas)
50g cranberries, halved
50g sultanas
10g mixed peel (candied peel)

580g strong white flour (bread flour)
80g sugar
1 teaspoon fine table salt
2 teaspoons mixedspice
1 teaspoon ground cinnamon
1 teaspoon grated orange zest
1 sachet of fast action dried yeast (7g)

1 tablespoon olive oil
1 large egg, beaten 
260mls fresh milk (heated to between 37-39°C)

a little extra flour for dusting the work surface and your hands for kneading
a little extra milk to brush the buns before they go in the oven

Method
Put the flour, sugar, salt, mixed spice, ground cinnamon, orange zest, and dried yeast (keeping the yeast away from the salt) into a large bowl or stand mixer. Mix to combine.

In a separate small bowl put the dried fruit and mixed peel and cover with boiling water – cover and set aside until the dough has had its first rise. (This plumps up the fruit and helps to prevent it stealing valuable moisture from the dough.)

Add the prepared Tangzhong paste to the flour mixture along with the olive oil, beaten egg and milk and mix until just combined. Once you have a smooth mixture, leave for 10 minutes so the flour can absorb some of the moisture and make a less sticky dough (thank you Dan Lepard for that tip).

Next, knead the dough in your stand mixer or by hand for about 5 minutes until it is smooth and elastic. Cover and leave in a warm place to rise until about doubled in size.

When the dough has risen, drain and dry the fruit on paper towels before proceeding with the next step.


Turn the risen dough out onto a lightly floured board and gently knead for a minute or so.  With your fingers, press it out into a sheet about 1cm thick and sprinkle the fruit over, leaving a margin of about 6cm around the edges. Fold one edge two thirds of the way over the sheet, and fold the opposite side over this, so you have a long, narrow rectangle. Press down with your fingers to encase the fruit inside, expanding the sheet once again. Repeat the folding process one more time, then knead the dough lightly to form a ball. (All this helps to distribute the fruit evenly).


Now, weigh the dough and divide it into 24 even portions for small buns, or 18 even portions for monstrous buns.  Shape the portions into smooth round balls, and place in a lightly oiled baking tin around 23cm x 33cm leaving a little room between them and their neighbours. Cover with a lightly oiled sheet of cling film and leave until the buns have doubled in size and snuggled up to their neighbours.


__________________________________

Brush gently with a little milk before completing the next step.

Next, pre-heat the oven to 180°C. While the oven is heating, make the flour paste for the cross decoration below:

For the cross decoration
100g plain flour
75mls cold water

Mix the two ingredients together in a small bowl until you have a smooth and lump-free paste that holds its shape. Place in a small piping bag (a baking parchment cone with a small hole snipped is perfect). You could use a sandwich bag with the corner snipped off but I’m trying to avoid gratuitous use of plastic where possible. Pipe a long line down the centre of each row of buns, following the contours of the dough. Then pipe lines across the middle of each row to form crosses.


Place in the pre-heated oven and bake for about 15 minutes or until risen and golden.

Tip: I like to turn my oven into a sauna for these, and it helps them rise better by keeping the crust soft until the dough has had time to puff up. To do this, place a baking tin half-filled with water on the bottom shelf of the oven when you pre-heat it. Be super careful when opening the oven as you will release a cloud of scalding hot steam.
__________________________________ 
For the honey glaze
2 – 3 tablespoons runny honey, warmed (place in a heatproof bowl and stand the bowl in hot water for a couple of minutes, or nuke it in the microwave for a few seconds until warmed through.).

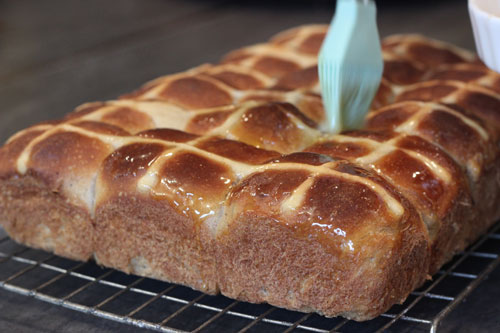
When the buns come out of the oven, brush with the warmed honey.


It is considered good luck to share these buns and the cinnamon and orange make them particularly good with coffee so what better excuse to invite some friends over!

They are good just as... but even better toasted and smothered with salty butter.


Happy Easter! 
x


First published 31 March 2020

Pin It

Thursday, September 29, 2022

All-in-one Pita Bread – best supporting actor !

Pin It

Pita is as plain and simple as a fact of life or the bald-faced truth... There is just no embellishing it. It is a back-drop for better things; the base melody; the supporting actor. Unfortunately... when the back-drop is flawed, when the base melody is off key, when the supporting actor stinks, it is all too obvious.
I bought pita recently and it wasn’t Oscar-winning material by a long stretch. As well as the handful of ingredients essential to creating this simple bread, it contained a list of extras as long as your arm, all there to extend shelf-life.
If pita isn’t up to scratch, then it drags down the rest of the meal. However, when this pocket bread is good, it is a building block of snack perfection, the perfect party bread, the best supporting actor in a luscious portable lunch.
Warning: once you have tasted homemade pita bread, commercially-produced stuff will never be good enough ever again.

For 8 perfect pita pockets you will need...
... to pre-heat the oven to 225°C at step 3

350g plain flour
125g finely ground wholemeal flour
7g sachet of fast acting dried yeast
2 tablespoons extra virgin olive oil
1 tablespoon honey
1 teaspoon fine table salt
280ml tepid water (35 - 38°C)              


1.      Place the first six ingredients together in a large mixing bowl. Add the warm water and mix until the ingredients come together in a ball. Turn the dough onto a lightly floured surface and knead for about 7 - 10 minutes until the dough is smooth and silky. To knead, fold the dough in half, then holding it in place with one hand, use the heel of the other hand to stretch the dough away from you, along the floured surface. Again fold it, rotate it about 1/8th of a turn and again press it away from you with the heel of your hand. Repeat, enjoying the yeasty scent and the silky feel of the dough as any woe or stress dissipates through your hands – bread-making is cheap therapy. (If, however, you have no woes, and possess a stand mixer with a dough-hook, 5 minutes in the machine will be sufficient.) Return the dough to the mixing bowl and cover with cling film or a clean tea towel. Leave in a warm, draught-free spot for about 2 hours or until doubled in size.
2.      Divide the dough into eight equal pieces, kneading each just long enough to shape it into a smooth ball. Flatten into a disk and leave to rise until again doubled in size and a finger poked into the dough leaves an indent (about an hour). If the dough springs back into shape, leave it to rise for a further half hour then test again.
3.      When you are ready to cook the bread, pre-heat the oven and boil a kettle of water. Place a baking dish on a lower shelf in the oven and carefully add some boiling water. This creates the perfect steamy atmosphere for this bread.
4.      While the oven is heating, roll out the dough disks into rounds about 3mm thick. Put 2 or 3 on a baking sheet and place in the hot oven. After about 3 minutes they will have puffed up impressively. Remove them from the oven before they’ve had a chance to turn golden (You can see I was so busy with my camera, I forgot that instruction myself and a few of them acquired a bit of a tan!) Cool on a wire rack. Cook the remaining breads.


My favourite way to use pita is to toast it then fill it with felafel and all the trimmings.
Yum!
Pin It

Tuesday, June 9, 2020

Boozy Summer Pudding – Bread + (Bob Geldof's) Berries + Booze = Brilliant !

Pin It


I’ve mentioned my school cookery class before. The course was “How to Make Kids Loathe Food”. Without doubt, it worked for certain dishes – like Summer Pudding. Honestly, how can stuffing bread with a few berries in sweet syrup ever amount to anything, especially if the bread is industrial and the berries from a tin.

When a friend served me Summer Pudding, I poked at it suspiciously remembering the awful school version. However, when I ventured to taste it, my taste buds died and went to heaven. It was one of the sunniest desserts I’ve eaten in a long time. You need to use day-old bread with integrity – that is, with a good springy crumb - and ripe fresh berries. However, the key ingredient is Time – it’s essential for the bread to soak up all the lovely berry juices so make it the day before you need it.

Like any simple dish, it will have a thousand variations. Purists will argue over the type of berries to include. I’ve chosen some of my favourites and included the slightly autumnal blackberries because they were sweet and available, and free (the ones in the picture were from Bob Geldof's garden in Faversham - well they were leaning over the wall...) . Vary the proportions according to preference and availability. In total you’ll need about 1.125 kg of berries.


For a 1 litre pudding serving 4 – 6 people you will need…

400g strawberries
1 tablespoon caster sugar
225g raspberries
225g blackberries
150g redcurrants
125g blueberries
150g caster sugar
3 tablespoons Triple Sec, Cointreau or other orange liqueur
4 tablespoons water
7 – 9 slices of good white bread. This should be a day old, cut into slices 1cm thick, crusts removed

Whipped cream to serve

Method
First choose a few perfect fruits for the top of the pudding and set aside.

Hull and halve the strawberries and place them in a non-metallic bowl. Sprinkle with the tablespoon of sugar.

Place the rest of the fruit in a medium saucepan with the remaining sugar, orange liqueur and water. Heat gently until the sugar has dissolved and the fruit has begun to release its juices – this will only take 3 – 5 minutes. You want the fruit to hold its shape as much as possible. As soon as the sugar has dissolved, remove from the heat and add the strawberries to the pan. Stir gently to distribute them throughout the rest of the fruit. Taste and add more sugar if required.

Line a 1 litre pudding bowl with cling film, leaving an overhang large enough to cover the base of the pudding when folded back across. (It’s easier to line the bowl with two overlapping strips of cling film rather than trying to shape one sheet to fit the bowl.)  Cut a circle from one slice of bread large enough to cover the base of the pudding bowl. Do this as neatly as possible as this will form the top of the finished dessert. Cut and arrange slices of bread to line the sides of the bowl – like a bread patchwork - leaving no gaps. If you have any tendency towards engineering or architecture, this is your moment to shine.

Spoon the warm berries and boozy juice into the lined pudding bowl and finish with a layer of bread to seal in the berries.

Berries n booze n bread should equal bleaughhh... but Alchemy intervenes!

Fold the cling film skirt over the pudding and cover with a small plate or saucer that just fits inside the pudding bowl. Weigh it down – I sit a couple of 400g tins on top of the plate. When it has cooled, transfer it to the fridge and leave it – still weighted – overnight.


To serve, fold back the cling film. Cover the bowl with a large inverted serving plate. Carefully flip the pudding upside down and remove the cling film. Decorate the pudding with the reserved fruit. Cut into wedges and serve with whipped cream.


Note: if you prefer to leave the booze out, substitute it for the same amount of good quality berry cordial (undiluted).


Pin It

Tuesday, February 25, 2020

White Soda Bread with Seeds – Too Many Cooks ...

Pin It
With two cooks in the house, sometimes my mental inventory of stores doesn’t tie in with what is (or, more often, is not) in the cupboard. I’ll often be half-way through baking a cake and I’ll reach for the eggs only to find that my beloved must have made a giant omelette for breakfast because the dozen or so that were there yesterday have vanished. 
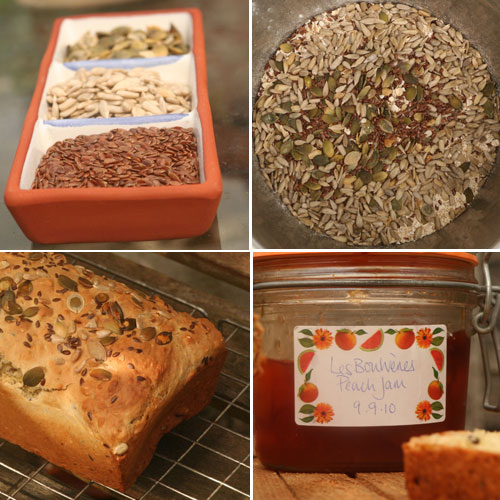
White Soda Bread with Seeds - merely a delivery device for peach jam

Today, I had a hankering for brown soda bread to go with my friend Penny’s incredible Peach Jam. There were a few obstacles in my way, namely no brown flour, and no oatmeal – the two main constituents of my brown soda bread recipe. I could have sworn there was some there last time I looked... hmmmmm.
This white soda bread was a total experiment. I added the seeds to make it seem half-healthy.

A quick and easy bread for when you're in a jam...


Soda bread is normally cooked on a baking sheet. This is quite a wet mixture so I’ve used a 2LB loaf tin.
For one 2LB loaf you will need...
...  to pre-heat your oven to 200°C

1 teaspoon olive/sunflower oil for the baking tin

Dry ingredients
500g plain flour
1 teaspoon bicarbonate of soda
1 teaspoon salt
125g mixed seeds (I used 50g pumpkin, and 25g each of brown linseed, sesame, and sunflower)

1 tablespoon runny honey
400mls buttermilk

1          Rub a 2LB loaf tin with the olive/sunflower oil.
2          Place the flour, bicarbonate of soda, salt and seeds in a mixing bowl, keeping back about a tablespoon of the mixed seeds. Stir the runny honey to the buttermilk, and add to the dry ingredients mixing just until no dry flour remains.
3          Transfer to the prepared baking tin and level the surface before scattering with the tablespoon of seeds you reserved. Place in the pre-heated oven and set your timer for 10 minutes. After 10 minutes has elapsed, lower the heat to 180°C and continue baking for a further 15 minutes.
4          Take the loaf from the oven and remove the tin. A cooked loaf will sound hollow when tapped on the base.
5          Leave to cool completely on a wire rack before slicing.

Always seek out the seed of triumph in every adversity                  ~ Og Mandino
... like making bread out of nothing when your other half has raided the stores    ~ me

As I’m writing this, my beloved has started cooking his demon chicken curry.  I wonder when he’ll discover that I’ve used the last of the yoghurt... and the cardamom... and the chillies... J
Pin It

Tuesday, July 16, 2019

Crumpets – in Search of the Hole-y Grail

Pin It


Indiana Jones had it easy. To find his Holy Grail, he merely had to deal with rats, fire, gunmen, betrayal and avoid being chopped to bits by a ship’s propeller. Mr Jones would have paled in the face of my mission – to make the Holey Grail of the griddle cake world – the perfect crumpet.
So, what constitutes the perfect crumpet?
According to my true blood English crumpet connoisseur, it must be: “light and fluffy with lots of holes in it, but it has to have a certain chewy bite to it. It is best eaten toasted and dripping with butter, which needs to soak through the holes. The holes are very important.”
Being Irish, perhaps I don’t fully appreciate the finer nuances of this yeasty little devil which is little known in the Emerald Isle. Perhaps it is ignorance that allows me to laugh in the face of such a challenge. Bring it on, I say - oh, and don’t forget the butter!

For 12 – 14 crumpets, enough for 4 – 6 people, you will need...
... crumpet rings*
125g strong white flour
125g plain flour
1 x 7g sachet of quick action dried yeast
2 teaspoons caster sugar
1 teaspoon fine salt
350mls water
1 tablespoon extra virgin olive oil (or melted butter)
1/2 teaspoon vanilla extract

Butter for greasing the crumpet rings

Method 
Place the strong flour, plain flour, yeast, sugar and salt in a mixing bowl and stir to combine.
Heat the water to between 27°C – 35°C. (This is approximately when the water feels neither hot nor cold. Too hot, it will kill the yeast. Too cold, it will just take longer to activate.) Add the olive oil (or melted butter) and vanilla extract to the warm water.
Make a well in the centre of the flour mixture and slowly add the water, incorporating the flour from around the edges, mixing to a thick smooth batter. Cover and leave in a warm place until the surface is covered with little bubbles (about 90 minutes).
Grease the crumpet rings well with butter and place them in a large frying pan over a medium heat - 4 fit snugly in my frying pan so I make them in 3 or 4 batches.
Rub the frying pan with a little butter, just within the area crumpet rings. Wait until the butter has melted and the rings are hot (otherwise the batter will stick horribly and you’ll never want to make crumpets again).
Fill the crumpet rings a little over half way – they’ll rise further as they cook. I use about 60mls of batter per crumpet. Cook gently until the top looks dry and is full of holes - about 5 to 7 minutes. Turn the crumpets over, and remove the rings if they will come away easily. Cook the crumpets for a further minute or so, until golden. Traditionally, crumpets are cooked only on one side but this results in a pale unattractive bread.
You can cool them on a wire rack and freeze them at this stage, for later revival in a toaster - which is the preferred manner of many crumpet fanciers. However, I prefer them fresh from the frying pan, smothered in butter - and large doses of an excellent homemade plum jam I was given recently.

*If you don’t have crumpet rings, melt a knob of butter in a frying pan over a medium heat. Spoon the batter into the pan to form little cakes – about 2 tablespoons of batter per cake. A crumpet without the support of a crumpet ring is called a pikelet – and is just as good.

Crumpet Connoisseur Verdict:
Light and fluffy? Check!  Lots of holes? Check !  A certain chewy bite? Check !
Would you like another - just to be sure ? Check, check, check !
 
Pin It

Tuesday, September 18, 2012

Roasted Panzanella with Lemon and Caper Dressing - almost too good to be true!

Pin It
 
This week has been almost too good to be true. According to my email, I am the beneficiary of several generous inheritances – mostly from people I’ve never heard of in Nigeria and South America.
Some random investor in China is prepared to lend me buckets of cash with no collateral required. Meanwhile, though I cannot for the life of me remember buying a ticket, it appears I have also won the Italian state lottery this week, so I won’t need to take Mr Wong up on his generous offer.
I am feeling quite overwhelmed by these riches that are – apparently – coming my way. Don't worry, I’m not going to lose the run of myself. Until the cash actually arrives, I will continue to live a simple life.
With that in mind, I have stoked up a hunger for simple, peasant food. Panzanella springs to mind. It is a thrifty Italian salad mainly of tomato, and yesterday’s bread. I’ve added roasted vegetables for punchier flavour and a more substantial dish. The dressing is inspired by my caper-hating sister-in-law, Rosie, who recently made the most incredibly delicious caper-laced, lemony tapenade.
To serve 4 as a main, or 6 – 8 as a side you will need...
... to pre-heat the oven to 180
°C

For the roasted vegetables
1 red onion, peeled, leaving the root intact
1 large red pepper, cut into large pieces
200g courgettes, cut into 2cm cubes
400g fresh tomatoes (a variety of different types if possible) cut into large chunks
2 tablespoons extra virgin olive oil
¼ teaspoon sea salt
¼ teaspoon freshly ground black pepper 

1                    First cut the red onion into 8 wedges, making sure each wedge gets a share of the root (this helps keep the onion pieces whole during cooking).
2                    Mix gently with the rest of the ingredients until coated in olive oil. Transfer to a shallow baking tray, spreading the vegetables out as much as possible so that they roast evenly. Roast in the pre-heated oven for 30 minutes or until they start to blacken at the edges. Leave to cool in the baking tray. While the vegetables are cooking, make the croutons

For the croutons
3 tablespoons extra virgin olive oil
1 clove garlic, crushed
¼ teaspoon Herbes de Provence (or dried basil)
¼ teaspoon sea salt
125g white country bread, ciabatta or baguette, cut into bite-sized cubes 

3                    Mix the first four ingredients together in a medium mixing bowl. Add the cubes of bread and turning them in the garlicky oil until it has been absorbed and the cubes are coated evenly.
4                    Transfer to a shallow baking tray and bake in the pre-heated oven for 5 minutes or until lightly golden brown. Turn the croutons over and replace in the oven for a further 2 minutes. (Set a timer as they go from golden to charcoal in no time). Leave to cool on the baking tray. 
 
Simple ingredients, magical food...
 
For the lemon and caper dressing
4 tablespoons sunflower oil (or other light flavourless oil)
2 tablespoons extra virgin olive oil
2 tablespoons freshly squeezed lemon juice (if you don’t have fresh juice, use white wine vinegar instead)
1 heaped teaspoon capers, rinsed to remove any vinegar or salt, then very finely chopped
½ clove garlic, crushed
¼ teaspoon salt
 
5                    Place all the dressing ingredients in my Super Salad Shaker (a.k.a. a jam jar with a lid), seal tightly and shake until combined. Couldn’t be simpler.
 
Seal tightly to avoid dressing the kitchen and self in delicious lemony dressing...

To assemble the salad...
 
While the vegetables and croutons are cooling you will need...
200g fresh tomatoes, cut into bite-sized chunks
150g cucumber, skin on, cut into bite-sized chunks
12 fat black olives, stones removed
Fresh basil 

6                    Place the tomatoes, cucumber and olives in a large serving bowl or platter.
7                    When the roasted vegetables and croutons have cooled, add them to the serving dish along with approximately 12 basil leaves and spoon most of the dressing over, turning the contents of the dish gently to coat them evenly with the dressing. Cover and leave in a cool place (but not the fridge unless you want woolly-textured tomatoes) for at least 30 minutes for the flavours to meld (alchemy at work!) or up to 12 hours. 

I feel a picnic coming on...
 
Taste-tester verdict:
Pin It