Tuesday, February 25, 2020

White Soda Bread with Seeds – Too Many Cooks ...

Pin It
With two cooks in the house, sometimes my mental inventory of stores doesn’t tie in with what is (or, more often, is not) in the cupboard. I’ll often be half-way through baking a cake and I’ll reach for the eggs only to find that my beloved must have made a giant omelette for breakfast because the dozen or so that were there yesterday have vanished. 
White Soda Bread with Seeds - merely a delivery device for peach jam

Today, I had a hankering for brown soda bread to go with my friend Penny’s incredible Peach Jam. There were a few obstacles in my way, namely no brown flour, and no oatmeal – the two main constituents of my brown soda bread recipe. I could have sworn there was some there last time I looked... hmmmmm.
This white soda bread was a total experiment. I added the seeds to make it seem half-healthy.

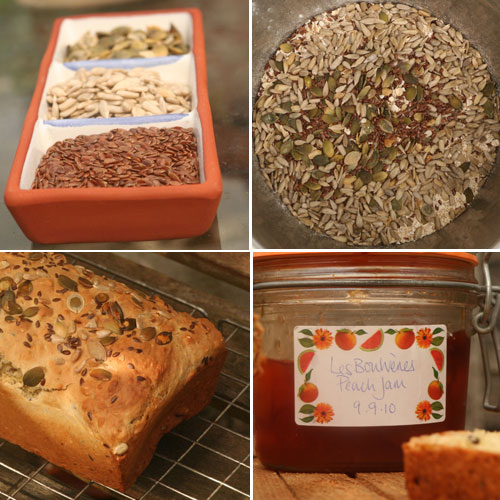
A quick and easy bread for when you're in a jam...


Soda bread is normally cooked on a baking sheet. This is quite a wet mixture so I’ve used a 2LB loaf tin.
For one 2LB loaf you will need...
...  to pre-heat your oven to 200°C

1 teaspoon olive/sunflower oil for the baking tin

Dry ingredients
500g plain flour
1 teaspoon bicarbonate of soda
1 teaspoon salt
125g mixed seeds (I used 50g pumpkin, and 25g each of brown linseed, sesame, and sunflower)

1 tablespoon runny honey
400mls buttermilk

1          Rub a 2LB loaf tin with the olive/sunflower oil.
2          Place the flour, bicarbonate of soda, salt and seeds in a mixing bowl, keeping back about a tablespoon of the mixed seeds. Stir the runny honey to the buttermilk, and add to the dry ingredients mixing just until no dry flour remains.
3          Transfer to the prepared baking tin and level the surface before scattering with the tablespoon of seeds you reserved. Place in the pre-heated oven and set your timer for 10 minutes. After 10 minutes has elapsed, lower the heat to 180°C and continue baking for a further 15 minutes.
4          Take the loaf from the oven and remove the tin. A cooked loaf will sound hollow when tapped on the base.
5          Leave to cool completely on a wire rack before slicing.

Always seek out the seed of triumph in every adversity                  ~ Og Mandino
... like making bread out of nothing when your other half has raided the stores    ~ me

As I’m writing this, my beloved has started cooking his demon chicken curry.  I wonder when he’ll discover that I’ve used the last of the yoghurt... and the cardamom... and the chillies... J
Pin It

Tuesday, February 18, 2020

Mardi Gras - the world is your Pancake!!!

Pin It PANCAKE DAY!!!!!  Mardi-Gras-in-the-kitchen day!!!!

Pancakes and crêpes are nothing on their own. Left to their own devices they would never go out. Savoury or sweet, they depend on fillings and dressings to give them a social life.

Though I’m a fiend for maple syrup, sometimes something as simple as a sprinkle of sugar and a squeeze of lemon juice is just the thing to make a pancake interesting. However, for a real taste of Carnival, my current favourite is the zingy vanilla orange caramel sauce at the end of this page.  Pour the hot syrup over pancakes or crêpes and feel your taste buds samba! Or perhaps you'd like to try some of my other favourites from the Alchemy archive


Try...

Boxty - traditional Irish potato pancakes, sweet or savoury?
Out of the laundry room and into the frying pan
(the gorgeous bowl and jug are by my aunt, Patricia Casey, artist and potter extraordinaire)

Or perhaps...
Cider and Cinnamon Crêpes - Time to practice your pancake-flipping skills!

Or will you go off-piste altogether and opt for Pączki Tuesday - instead with these gorgeous Polish doughnuts


It's Stomp's fault... (you'll have to read the article to find out why)

If you are going for savoury, you could go gallic with buckwheat galettes

Or try this sensational Vanilla Orange Caramel sauce drizzled over a crepe - which to choose? The world is your pancake!

My choice? Yup! You've guessed it!  And yours? Let me know in the comments below.

Pin It

Tuesday, February 11, 2020

‘Just because...’ cookies - and Valentine's Day rebooted !

Pin It


If you listen hard you will hear the unromantic din of cash registers chi-chinging all over the world. That’s the sound of big business cashing in on the scurry to live up to romantic expectations - your own, or someone else’s - on February 14th.
Valentine’s Day is quite possibly the least romantic day of the year. If you are someone’s special someone, hopefully you’ll already know it - and show it - in a thousand tiny ways throughout the year. You will be least in need of a day of ersatz romance.
Love is bigger than just romantic love. It’s in the everyday things: in the sticky pre-licked sweet my tiniest niece presses into my hand when I know she really, really, really wants it for herself; it’s in the email/card/text/call that says between the lines “Hey, I was thinking of you”. It’s in making the dinner/walking the dog/cleaning the bathroom/rescuing the laundry from a sudden rain shower without having to be asked. It’s in accepting the irritating imperfections right along with the good qualities that are so much easier to love, whether you are family, friend, or lover.
Since 2011, there has been a move to ‘reboot’ Valentine’s Day as Generosity Day; to make it less ‘cosy couples’ and more egalitarian. At first glance, this smacks of an ‘everyone-gets-a-medal’ race, but why not!  Generosity Day is an opportunity to practice random acts of, well, generosity. It is a day for giving rather than taking.
I’m celebrating February 14th (whatever you want to call it) with my fully customisable ‘Just because...’ cookies. I don’t need any excuse to make them. They can be ... Just because... I wanted to say thanks. Just because... you make me smile... Just because... sometimes you can read my mind. Just because... well... just because!


For 40 - 50  ‘Just because...’ cookies (depending on size) you will need...
... to pre-heat the oven to 160°C
200g butter (at room temperature)
100g icing sugar
1 tablespoon orange zest
250g plain flour
50g cocoa powder, sifted to remove any lumps
a small pinch of fine table salt
1 large egg yolk
1 teaspoon instant coffee dissolved in 1 teaspoon of boiling water 

To decorate you will need chocolate and sprinkles. I’m not going to be too prescriptive about this bit of the recipe – this is the ‘pimp my cookie’ bit, where you get to customise these cookies for those lucky people who are loved by you, but I’ll tell you what I did. 

1.                  First make the cookies - Place the butter, icing sugar and orange zest in a mixing bowl or stand mixer and beat together until fluffy and lighter in colour.
2.                  Mix together the flour, cocoa powder and salt and add to the butter mixture about a third at a time, beating until well combined. Finally, add the egg yolk and dissolved coffee and mix until the ingredients come together in a ball.
3.                  Turn onto a lightly floured work surface and roll out to a thickness of about 3mm. Using cookie cutters, cut into shapes – I’ve chosen hearts in a variety of sizes. Any leftovers can be squashed into a ball and re-rolled.
4.                  Place on a baking tray and bake in the pre-heated oven for 10 minutes. When the cooking time has elapsed, remove from the oven and leave to cool on the baking tray for about 3 minutes before transferring carefully to a cooling rack. When completely cold, decorate as desired.


Here’s what I did: 

5.                  I melted 100g of good quality white chocolate in a small Ziploc freezer bag by removing all the air, sealing it and putting it in a bowl of hot water. In another Ziploc bag, I placed 50g good quality dark chocolate together with 50g good quality milk chocolate and melted it in the bowl of hot water. This gives a subtle two-tone, two-flavour effect.
6.                  While the chocolate was melting, I prepared a variety of sprinkles: chopped dried sour cherries, chopped dried apricots, chopped toasted hazelnuts, Maldon sea salt crystals. Use your imagination - the world is your sprinkle :)
7.                 When the chocolate had melted, I snipped a tiny corner off each bag, drizzling chocolate directly onto the cookies.
8.                  While the chocolate was still melted I sprinkled my chosen toppings onto the cookies.  

Just because... you deserve a treat!

When the cookies have completely set, make yourself a cuppa and taste-test a couple of these treats before packaging them prettily and distributing them to your loved ones, just because... 


Just because... you are salt of the earth!

Just because... xxx


Pin It

Sunday, February 9, 2020

Magical Marmalade - as Scottish as the Bonnie Prince!

Pin It
Bring some sunshine to the table
Who can hear the word ‘marmalade’ without tartan and bagpipes dancing across their mind?  Och, sure isn’t marmalade as Scottish as wee Bonnie Prince Charlie... as shortbread... as Irn-Bru, and Whisky without the ‘e’ ...  isn’t it?

Well, while there is a tale about a storm-battered ship, a load of sea-sick oranges and an enterprising couple named James and Janet Keiller, it appears that Dundee’s claim to be the birthplace of marmalade might be an “alternative fact”. 

It turns out that there are several recipes in archives around England that pre-date the Keiller’s 1797 marmalade factory by almost a century. However, even before that, various mermeladas were being made across Europe, (although not necessarily containing oranges) and even the Romans were known to partake of marmelo - preserved quince, pounded and mixed with honey. The Bonnie Prince himself was born in... Rome! ... so perhaps he knew a thing or two about marmalade long before it made an appearance in Dundee. 

A Spanish friend gave me the rough method for this marmalade. It’s all about proportions and once you stick to the proportions - and as long as the fruit contains enough pectin to set the marmalade - the citrus fruit content and any flavourings you choose to add are up to you. Seville oranges have a very high pectin content.  If I’m using any other orange, I include the juice of 2 lemons  to increase the pectin content. 

Because the St Clement's Marmalade recipe below contains both Seville oranges, and lemons, there is no need to add any extra lemon juice. Why is orange and lemon marmalade called St Clement's? Apparently citrus fruits used to be offloaded on the wharves of the Thames within the sound of the bells of St Clement's church in Eastcheap. 'Oranges and lemons say the bells of St Clement's.'

This marmalade doesn’t store for more than a few months outside the fridge due to the relatively low sugar content so I like to make small amounts that can be eaten quickly.

It is ready to eat straight away but the flavours develop wonderfully after a few weeks.
What this magical marmalade tastes like!

For 5 x 360g jars of magical marmalade you will need
1.5kg Seville oranges or a mixture of citrus fruits, untreated if possible
(I used 4 Seville oranges, 2 lemons and the rest eating oranges)

Approximately 1kg caster sugar
¾ teaspoon vanilla extract

You will also need:
A piece of muslin cloth / cheese cloth to enclose all pips and any stray pith
A plate or shallow bowl to catch any juices as you cut up the fruit
A jam pan (Maslin pan) or a large heavy bottomed pot
A ½ litre measuring jug (or equivalent) and a weighing scales
A sugar thermometer
Sterilised jam jars* (I used 5 recycled Bonne Maman jars – they take 360g each, or about 12oz)
Jam pot covers - they normally come in a packet which includes waxed discs, cellophane discs, elastic bands and labels
A jam funnel makes life a lot easier

Method
First wash the fruit, then place in a jam pan or a large pot and cover with water. If necessary, place a heatproof plate on top of the fruit to weigh it down to keep it submerged in the water. Bring the pan to the boil and leave it to simmer gently for about 2 hours or until the fruit is easily pierced with a fork. Leave to cool.


There's nothing like a hot bath to soften the skin...

Once cool, drain away the water and taking each piece of fruit in turn, halve it across the middle. Using a fork, rake out any pips, and any tough white membrane snagged by the fork, placing them in the muslin cloth. This will provide the pectin that will set your marmalade. 


Using a fork, rake out any pips, placing them in the muslin cloth

Using a sharp knife, slice each piece of fruit into shreds as thin or as thick as you like and tip into a large bowl along with any juices that have escaped. When you have finished preparing the fruit, you will need to measure it and add sugar in a ratio of 5:4. Put away the calculator! It’s simple.

Slice each piece of fruit into shreds as thin or as thick as you like

Take your measuring jug and fill it to the 500ml mark with the prepared fruit. Tip back into the jam pan or into a large heavy bottomed pot. Continue measuring until you have accounted for all the fruit.


For every 500ml of prepared fruit, add 400g of caster sugar

Now, for every 500ml of prepared fruit, add 400g of caster sugar to the pan. (I ended up with 1250mls of prepared fruit on this occasion. So, I added exactly 1kg of sugar to the pan.)


Make a little purse of the pips, wrapping them in the muslin or cheese cloth and tying the neck securely with string.  Tie the string to the handle of the pan so that the package is suspended in the mixture. Bring the pan slowly to the boil, stirring until the sugar has dissolved.
Pips and stray pulp ready to be packaged.

Once the sugar has dissolved, let the mixture come to a rapid (or rolling) boil, allowing it to bubble for between 8 and 10 minutes – stirring occasionally with a wooden spoon to make sure it isn’t burning on the bottom - then pop your sugar thermometer into the jam pan and wait for the temperature to hit 220°F/221°F for a nicely set marmalade. Below that, it tends to be too runny. At 222°F you’ll get a pretty solid set. At 223°F it starts to darken and become bitter. After that, you are heading into toffee territory.


A rapid or rolling boil full of bursting bubbles

You could also try the famous wrinkle test – pop three metal spoons in the freezer while you are boiling the marmalade. After 10 minutes take the marmalade off the heat and drop a small amount of marmalade onto one of the spoons. As soon as it is cool enough to touch, push gently with your finger. If the surface wrinkles, the marmalade will set. If not, continue boiling for another minute and test again with the second spoon. Repeat until you can see the wrinkles appear.

I prefer to rely on the thermometer as this test gives me wrinkles.

Once the marmalade has reached setting point, stir in the vanilla extract and remove the pan from the heat. (If you prefer, you could stir in 100mls of whiskey to the pan at this stage) Take the muslin bag out of the marmalade (carefully – it’s very, very hot!) and as soon as it is cool enough to handle, squeeze out any remaining pectin-rich juices and stir into the marmalade. Let the marmalade sit for a total of 15 minutes. This ensures that the fruit will be distributed evenly throughout the preserve when you transfer it to the jars.

Carefully transfer to the sterilised jars –it is still piping hot. A jam funnel makes life much easier and helps keep the jars drip free. Press waxed jam discs against the surface of the marmalade then seal with cellophane covers, or use Le Parfait ''kiln-clip’’ jars.

A jam funnel makes life much easier and helps keep the jars drip free
 
Store in a cool dark place for a couple of months or keep in the fridge.

*Sterilise your jam jars by putting them through the dishwasher on whatever cycle you use to wash glasses, or do as my mum does and wash them thoroughly in hot soapy water, rinse and allow to dry in your oven at 100°C (or 212°F).  Pin It