Saturday, March 31, 2012

Strawberry & Ginger Jam – and Confessions of a Blog Trainer

Pin It

I would be useless as a dog trainer - I cannot even get my blog to behave! To show you what I mean, let’s eavesdrop on a typical scene from Alchemy in the Kitchen...

Me:                 Hey, blog. What are we going to cook today?
Alchemy:       [Excitedly] How about strawberry jam?
Me:                 No! I know the weather is weirdly wonderful for this time of the year but it ain’t strawberry season quite yet. We’re making stuffed baked onions today.
Alchemy:       Whinge. Sulk. Blank page.
Me:                 [softening a little] Alright then, how about a nice pancake cannelloni? (see, trying to bargain – a fatal mistake for a blog trainer to make!)
Alchemy:       Silence. Absence of fingers tapping over keys. Tumble weed.
Me:                 Strawberry jam, eh? [voice-over of me thinking to self: Maybe this blog has a point.  The last twelve months have been relatively jam-free because the jam-maker extraordinaire in my life, my mother, has had to cope with first a fire, then less than a year later, an even more damaging flood when the miniscule stream behind her house rose by a terrifying 12 feet in the space of a few hours in Dublin’s first ‘Monster Rain’. Jam has been the last thing on my mother’s mind. (Although with all the silt the flood left behind, it’s going to be a fantastic year for the fruit trees, Mam...   Mam?)
                        Ok, maybe you have a point, blog. Let’s pop down to the shops. If they have some decent berries, you can have your way. Just this once, mind!
The End


So, you can see it would be useless to send me your dog for training.
Anyway... while I absolutely love homemade jam, I don’t eat vast quantities of it and don’t have ideal storage for it. Therefore unless I am making it as gifts, I make only a little at a time.

For approximately 350g (1 small jar) of delicious strawberry and ginger jam you will need:
350g fresh strawberries, rinsed, dried and chopped into bite-sized pieces
200g caster sugar
30g fresh ginger, peeled and cut into 3 or 4 large slices
3 tablespoons fresh lemon juice

Sugar and spice...

If you don’t have a sugar thermometer, put a saucer or small plate in the fridge before you start – you’ll need this to test that the jam has set.
You will also need a sterilised jam jar – To sterilise jars, I run mine through the dishwasher but you could wash them and pop them in the oven at 100°C for a few minutes.
1                    Place the strawberries and ginger in a glass bowl and add the sugar. Cover and leave overnight. The sugar will draw the juice out of the berries. The following day, transfer to a large saucepan (you need plenty of room for the jam to bubble). Heat gently until all the sugar is dissolved, stirring occasionally with a wooden spoon. When the sugar has dissolved, add the lemon juice, then turn up the heat. Pop the sugar thermometer into the pot. Allow to bubble until the temperature comes up to ‘Jam’ (106°C or 222°F).  Be sure to take a moment to enjoy the heavenly scent rising from the saucepan. If you don’t have a sugar thermometer, simply keep the jam bubbling for 8 minutes, then test it the old-fashioned way by spooning a little onto the cold saucer you placed in the fridge. Leave it a moment or two to cool, then push your finger through the jam. If the surface wrinkles, the jam will set. If not, continue letting the jam bubble for a minute or so more, then test again.
2                    Remove the jam from the heat and fish out the pieces of ginger. Leave the jam to cool for about 15 minutes before transferring to the sterilised jar. This is because if you pour the jam into a jar while it is still very hot, all the fruit rises to the top of the jar. If you leave it to cool a little first, the fruit will distribute itself evenly.


I think this batch has Victoria Sponge written all over it. What say you?
Pin It

Friday, March 16, 2012

‘Irish’ Eggs – Green, White and Gold for Paddy’s Day !

Pin It

I have horrible memories of my one appearance in the Dublin Paddy’s Day parade. I washed my costume the night before and it hadn’t quite dried the following morning. It actually formed a layer of frost while we waited for the parade to begin, only thawing out as I high-kicked my way down O’Connell Street. I was aiming for ‘glamorous’ but as I was a pale shade of blue under my fake tan, I think I achieved ‘Smurf’. Brrrrrr.
Traditionally the booziest day in the year, the Dublin parade has evolved from concentrated one-day Oktoberfest, to a more civilised week-long festival with plenty of interesting things to do besides consume vast lakes of Guinness.
While I try to get to some of the events, the best place to catch the parade is at home, in front of the TV, with suitably-coloured food to snack on. There has to be green. There has to be white, there has to be gold.
In my family home, the traditional meal was always bacon and cabbage with mashed potato and turnip so there was the green, white and gold of our flag on the plate. Keeping the colours in mind, and keeping in mind that our national saint’s day has gone all sophisti-mi-cated (to be said in a Dub accent), here is a wee snack for the day, an Irish version of the ‘Scotch’ egg, wrapped in a parsley colcannon. Make sure to use a floury potato.
For 12 ‘Irish’ eggs (feeding 4 people as a canapĂ©) you will need...
… a deep fat fryer
12 quails’ eggs
4-6 slices of proscuitto or other cured ham (optional), cut into strips
360g freshly cooked mashed potato, simply seasoned with salt and white pepper, and cooled (don’t add butter or milk when mashing – you want this mixture as dry as possible).
4 tablespoons very finely chopped fresh parsley
1 spring onion, very finely chopped

Coating
6 tablespoons plain flour
2 large eggs, beaten
100g dried breadcrumbs

Sunflower oil for deep frying


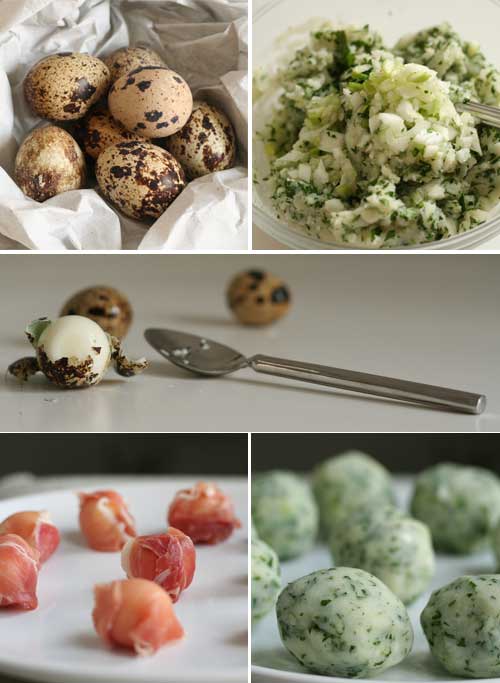
1          First, hard boil the eggs by placing them in a saucepan of cold water, bringing them to the boil and boiling for 90 seconds. Drain the saucepan carefully and fill with cold water to cool the eggs quickly (otherwise you end up with that nasty green ring around the yolk – not the look I’m going for). Peel the eggs and leave to one side while you prepare the rest of the ingredients.
2          Add the parsley and spring onion to the mashed potato and mix well.
3          Pat the quails’ eggs dry with kitchen paper and wrap with the strips of prosciutto.
4          Take a walnut-sized portion of the potato mixture in the palm of one hand and with the other, pat it into a round approximately ½ a centimetre thick. Place one of the quails’ eggs in the centre of the mixture and carefully enclose it in the potato, adding a little more potato if necessary to seal it in. (Be careful not to trap air, which would expand when frying and cause the package to burst.) Roll gently between the palms of your hands to form a smooth egg shape. Place on a tray and continue until you have enclosed all the eggs similarly. Refrigerate until ready to cook.
5          When you are ready to eat, set up a dipping station: Place the flour in a shallow bowl. Place the beaten egg in another shallow bowl beside it. Place the breadcrumbs in yet another bowl.
6          Carefully dip the prepared eggs in the flour, then the egg, then the breadcrumbs. Follow with a second bath of egg and a second coating of breadcrumbs, patting gently to ensure a good stick. When you have coated all the eggs, heat your deep fat fryer to 180°C.
7          When the oil is at the correct temperature, place the prepared eggs in the basket – don’t overcrowd them or you’ll lower the temperature and the end result will be oily and horrible - and carefully lower into the hot fat. Cook for 3 minutes or until golden brown. Drain on kitchen paper and serve immediately – unlike their ‘Scotch’ cousins, they don’t hang about.

Green, white, gold (and delicious)

Are these finicky? Yes.  Are they worth it? I think so. Happy St Patrick’s Day.
Pin It

Sunday, March 11, 2012

Brioche Pudding with Sour Cherries and White Chocolate – a crowd pleaser!

Pin It


Bread-and-Butter Pudding is one of the great mysteries of the universe. How is it that such a simple collection of ingredients - stale bread, a few eggs, a little sugar and some dairy - can make such a crowd-pleasing dessert?

I have some friends coming for dinner so I have upped the ingredients a notch to raise this dessert from ‘family favourite’ to ‘elegant afters’... Hey, who am I kidding? This dessert will never be elegant but it tastes really, really good. It is light and luscious, with a crunchy sugary almond top. What more could you ask for from a dessert!

For 6 servings you will need...

... to pre-heat the oven to 170°C at step 3

25g butter, at room temperature, to butter 6 ramekins or individual pie dishes
350g brioche, cut into slices about 1cm thick, then cut into triangles
120g good quality white chocolate, roughly chopped
60g dried sour cherries (dried cranberries can be substituted)
375mls fresh milk
180mls fresh cream
75g runny honey
3 eggs, beaten
1 teaspoon grated lemon zest
60g almonds, roughly chopped

Icing sugar for dusting

Whipped cream or ice cream to serve 

1                 Butter six ramekins or individual pie dishes. Arrange a layer of brioche triangles in the base of each. Scatter the sour cherries and the chopped white chocolate over this layer. Cover with another layer of brioche.
2                 Pour the cream and milk into a jug then add the honey. (The easiest way to weigh the honey is to put the jug on weighing scales and add the honey directly into the jug). Add the beaten eggs and lemon zest and stir until all the ingredients are well combined. Divide this raw custard between the dishes and scatter the chopped almonds over the top. Cover loosely with cling film and leave in the fridge for several hours or overnight for the brioche to absorb the mixture and for the lemony vanilla flavours to meld.
3                 When you are ready to cook the brioche pudding, pre-heat the oven to 170°C and boil a kettle of water. Meanwhile, dust the puddings with a generous layer of icing sugar. When the water has boiled, place the puddings in a roasting tin then transfer the tin to the oven. Carefully add enough boiling water to come about halfway up the sides of the ramekins. This helps distribute the heat evenly and avoids the eggs overcooking.
4                 Bake the puddings for about 30 minutes or until golden brown. Serve immediately with whipped cream or good vanilla ice cream. (While at their best straight out of the oven, these have been known to make an excellent breakfast.) 

Variations: This dessert is also really good with French bread, or croissants. Vary the flavours by adding different dried fruits and flavouring the egg mixture with spices (I love dried apricot and cardamom; or candied orange peel and fresh ginger).
Pin It

Saturday, March 3, 2012

Boquerones Fritos – a taste of happily ever after !

Pin It
Every time I taste boquerones fritos it takes me back to a magical week spent with some writer friends in a remote Spanish village near Grenada about ten years ago. It was the sort of place where you could expect to be woken at dawn by the sound of cowbells and donkey carts rattling through streets too steep and narrow for cars.
Here I was first introduced to the notion of tapas: you order a drink and a little plate of something wonderful arrives with it. How civilised! In one cervecerĂ­a, the patrĂłn produced plates of fat green olives, black morcilla, rosy petals of jamĂłn, and lots more, placing them on the zinc counter with generosity and regularity, there for everyone to share.
Hmmmm... potential
There was nearly an international incident however, when one of the girls mistakenly thought one of the locals was hogging a plate of fried anchovies. The aroma was sensational. I guess she couldn’t help herself. They were just too tempting. She reached over his shoulder (gasp!) and helped herself to a handful of golden fish... which just happened to be the man’s lunch. To this day, the incident is still a topic for discussion in the village. Once the unfortunate man had gotten over the shock and the fish thief had gotten over her mortification and apologised, they got chatting. She stole his fish; he stole her heart; it was a fair swap and they lived happily ever after. The End.
So, anyway, back to the fish...
Two or three boquerones fritos with a squeeze of lemon are the perfect accompaniment to a cold beer on a sunny evening. Any more than that, and for me, they begin to taste a little one dimensional. To keep the taste buds tantalised, make each mouthful a surprise. Here’s how.
Keep the taste buds tantalised by making each mouthful different
To serve 4 – 6 people as a canapĂ© you will need...
Approximately 36 fresh anchovies (or about 300g), heads and insides removed
Filling 1
1 small clove of garlic, crushed and mixed with 1 teaspoon very finely chopped fresh parsley
Filling 2
1 – 2 slices of Serrano ham or prosciutto cut into narrow strips – about ½ cm wide
Filling 3
1 red chilli, very finely chopped
Coating
6 tablespoons plain flour
a pinch of fine table salt
2 large eggs, beaten
100g dried breadcrumbs
Olive oil for cooking
A little sea salt (Maldon) for sprinkling
Wedges of lemon to serve

Flour, egg, breadcrumbs... simple ingredients, magical food
1.                 Divide the anchovies into 3 equal portions. Fill the first portion with the garlic and parsley mixture, gently pressing the fish closed over the filling. Fill the second portion with ribbons of Serrano ham or prosciutto. Fill the third portion with the finely chopped chilli. Make sure to press each fish gently to close it over the filling. Cover and refrigerate for at least an hour to allow the flavours to penetrate the flesh.
2.                 When you are ready to cook the fish, set up a ‘dipping station’: place the flour in a shallow bowl and add a pinch of salt; place the beaten egg in another shallow bowl beside it; place the breadcrumbs in yet another bowl (yes, there’s lots of washing up but it’s worth it). Dip the prepared anchovies into the flour, then into the egg, then finally into the breadcrumbs. (Tip: use one hand for this dipping process, as doubtless as soon as you are covered in eggy breadcrumbs, the phone/doorbell will ring.) Place the dipped anchovies on a plate ready to be fried.
3.                 Pour olive oil into a large frying pan to a depth of ½ cm and place over a medium heat. When the oil is good and hot, but not smoking, add the anchovies. They should sizzle when they hit the oil. You want a crisp coating so don’t overcrowd the pan. As soon as one side is golden brown, turn them to cook the other side. This takes about 90 seconds in total. When they are golden, lift them out of the oil with a slotted spoon and serve immediately as these do not live happily ever after, but go from sublime to so-so in about one minute flat. Serve with wedges of lemon and, if you have some homemade mayonnaise, so much the better.
Pin It