Tuesday, December 5, 2017

Pupcakes – the main ingredient is imagination!

Pin It


When my sister said “Cake Sale... Next Saturday... For charity... Inspiration for the novice baker please?!”, it had to be Pupcakes.

These are my (current) favourites. They are a little fiddly to make but so worth it when you see the reaction they get. Both kids and grownups deliberate for ages over their choice. When I point out that each of these little cuties tastes the same, I often get the reply “But, Hester! They all have different personalities! I have to find the one that’s right for me!”

For 1 dozen cute pupcakes (each with their own personality) you will need...
... a small star-shaped piping nozzle such as a Wilton 22 and a piping bag (or a freezer bag with the corner snipped off to accommodate the piping nozzle).
1 dozen vanilla-flavoured plain cupcakes

Buttercream Icing
250g butter (not dairy spread), at room temperature (i.e. soft)
275g icing sugar, sifted
½ teaspoon vanilla extract

1.                 Place the soft butter together with half the icing sugar in a large mixing bowl or stand mixer. Mix together slowly to avoid filling the kitchen with a sweet sugar cloud. When mixed, add the second half of the icing sugar and the vanilla essence and whip until light and fluffy – I usually mix this in my stand mixer, leaving it running for 5 minutes. This amount will decorate 12 cupcakes.

To decorate the pupcakes you will need...
6 red/pink Starburst sweets (or similar soft fruit caramels), for the tongue
6 marshmallows for the muzzle, snipped in half so you have two discs from each
a further 4 marshmallows for the ears, each snipped into 4 long slices then rolled out to make long floppy ear shapes
24 Smarties (or similar sweets) for the eyes (pairs of matching colours if possible)
12 Smarties (or similar) for the nose - pink or brown look good

a little imagination 
 
Mmmmm, I feel like a kid in a candy store!

2.                 First, make the tongues: Unwrap 1 Starburst (or soft fruit caramel) and place it in the microwave for about 4 seconds to soften it slightly. Roll it out to a thickness of about 2mm. Using a kitchen scissors, cut out rounded teardrop shapes about the size of your index fingernail. You should get 2 tongues from each sweet. Fold each teardrop gently in half, then unfold to create a line down the centre of the tongue. Gently bend to make natural-looking tongue shapes (as shown in the photo above). Ok, that was the difficult bit. The rest is an easy assembly job.
3.                 Next, If your cupcakes are domed, cut the tops off in line with the top of the cupcake cases to make a level surface for your icing.
4.                 Half-fill your piping bag with the freshly-whipped icing (piping bags are a lot easier to work with if not too full).
5.                 Cup a cake in one hand and, with the other, pipe icing all over the surface using little stabbing motions to mimic the appearance of fur.  It doesn’t have to be too neat.
6.                 Place a marshmallow half – with the sticky, cut side, down - off-centre to create the muzzle. Cover this with icing too. Place 2 Smartie eyes on the cake as shown in the photo below. Top the muzzle with another Smartie for the nose.
7.                 Press a pair of marshmallow ears either side of the eyes, making sure a sticky side is in contact with the icing as this helps it adhere.
8.                 Insert a Starburst tongue between the muzzle and the cupcake to secure.
9.                 Finally, pipe a cute little curl just over the eyes. Once you’ve done one, the rest are much quicker to assemble. Store in a cool dry place (not the fridge!)
Start with a level base; use half a marshmallow for the muzzle; add marshmallow ears
and candy eyes and nose; finally poke the tongue just under the base of the muzzle. 

The event, at St Matthias Hall in Killiney, Co. Dublin on Saturday, December 1st, 12 noon to 2pm, is in aid of the Intellectual Disability Association of Lesotho. Christmas music... mulled wine... tea, coffee, hot chocolate with marshmallows...  mince pies.... cakes, buns, cupcakes etc. as well as some Christmas crafts... Break Christmas in gently...

Come along on Saturday and meet the Ambassador of Lesotho and his family as you deliver a delicious donation, or simply take time out to enjoy one of the gorgeous creations on offer along with a cuppa and maybe even get some of your Christmas shopping done.


And, hey! Hands off! That one's mine!

Other bake sale ideas include:

Honey, Lemon and Almond Tartlets - this recipe makes 18
Banana, Pear and Coconut Loaf - excellent with coffee, improves if made ahead of time

If you have your own favourite bake sale recipe that you’d like to share with the bakers participating in the sale, please email me your link at simpleingredientsmagicalfood@gmail.com, and I’d be delighted to add it to the list. Pin It

Saturday, November 11, 2017

Plaited Porter Bread – a loaf of plain is your only man !

Pin It


I felt sorry for the poor chefs each wrestling to turn four obstinate strands of dough into a neatly-plaited loaf, under the watchful eyes of (the acerbic) Monica Galetti and (the wincing) Michel Roux Jnr., in a recent episode of Masterchef - the Professionals.
Herding mice at the crossroads is the expression that came to mind as I watched those seemingly-inanimate strands doggedly resist all attempts to arrange them into neat, braided order.

Although it might seem like it, you don’t need four hands, a degree in juggling, and a black belt in macramé to end up with a rather impressive bread. You just need a little know-how, and to be able to count to 4. (Although, a little practice doesn’t go astray either.)
For a bread with a slightly bitter edge that's perfect with cheese, I used the best part of "a pint of plain", but you could use water instead.

For 1 plaited loaf, you will need...
Bread dough
500g strong white flour
1 x 7g sachet of fast action bread yeast
2 teaspoons salt
2 tablespoons olive oil
½ teaspoon caster sugar
330mls porter (Guinness, Murphy’s, or Beamish)

Egg wash
1 small egg, beaten, mixed with a pinch of salt

(optional) a few oats, or seeds for sprinkling over the top of the loaf (poppy, sunflower, pumpkin or sesame all work for me)

Method
Place the first 5 ingredients in a mixing bowl or stand mixer and mix to combine. Warm the porter to between 27°C–35°C. (If you don’t have a thermometer, this is when a finger dipped in the beer will feel neither hot nor cold. Too hot, it will kill the yeast. Too cold, it will just take longer to activate.)

Add the warm porter to the dry ingredients and mix until combined. If you are using a stand mixer with a dough hook, mix for about 8 minutes. If kneading by hand, knead until the dough is smooth and elastic (about 10 minutes).
Place the dough back in the bowl. Cover with some oiled cling film and leave in a warm place to rise for about an hour or until doubled in size.
Next, turn the dough out onto a floured work surface and knead for a minute or so. The dough will collapse alarmingly but don’t worry, the yeast is still working.

Divide the dough into four even pieces and roll each into a sausage shape approximately 30cm long and tapered slightly at each end.
Join the four dough ‘sausages’ at one end, with the other ends fanning out. Number the positions of the fanned ends: 1, 2, 3, 4. The number of the position doesn’t change. Every time you move a strand it takes the number of its new position.

Ok, here goes...

Cross strand 4 over strand 2. Cross 1 over 3. Cross 2 over 3.

From Top Right to Bottom Right (strands shown in their new position) :
 Fan out the dough strands; cross 4 over 2; cross 1 over 3, cross 2 over 3
Repeat the above sequence until you have a tidy plait. Tuck both ends under to neaten the loaf. Place on a lightly floured baking sheet. Cover and leave to rise once more in a warm place for about 30 minutes or until doubled in size. (To check if the dough has proved sufficiently, poke it with a finger. The indent should remain. If it bounces back quickly, let it rise for a little longer before checking again.)

When you are ready to bake, pre-heat the oven to 200°C.  While the oven is heating, brush the dough with the beaten egg. Lightly sprinkle with oats or seeds if using. Transfer to the pre-heated over and bake for 10 minutes, then turn the oven down to 180°C and continue baking for a further 15 minutes. Remove from the oven and tap the base of the bread. It should sound hollow. If not, return it to the oven for a further 5 minutes. Cool on a rack.


Pin It

Tuesday, October 17, 2017

Rosemary Garlic Sautéed Potatoes – pretty close to perfect

Pin It


As an Irishwoman, I am genetically predisposed to adore potatoes. Mashed... baked... fried... chipped... roast... steamed... you name it, I’m there, knife and fork - or just plain fingers - at the ready.
It is very hard to pick a favourite. A strong contender - and a simple classic dish that I’ve rustled up since childhood - is sautéed potatoes. Excellent with roast or grilled meats, with a delicious golden crust, and laced with garlic and rosemary, I think this version is pretty close to perfect (and if onions make you cry, read the simple tips at the end of the recipe).

As a side for 2 greedy people, or 3 – 4 more restrained appetites you will need:
500g floury potatoes such as Rooster, peeled and cut into bite-sized cubes (of about 1.5cm)

25g butter
1 tablespoon extra virgin olive oil
1 onion, halved from top to bottom, then sliced thinly into half moons
1 teaspoon of very finely chopped fresh rosemary
1 clove of garlic, very finely chopped


50g butter
3 tablespoons extra virgin olive oil
Sea salt (I prefer Maldon for this dish)
 
 
1.                 Place the potatoes in a medium saucepan and cover with cold water. Bring to the boil then simmer gently for 10 minutes. Carefully drain off the water and set the potatoes aside for a couple of minutes to allow the steam to evaporate. You want the potatoes to be as dry as possible. They will still be a little firm but that’s perfect. You don’t want them to break up when you start to fry them.
2.                 While you are waiting for the potatoes to cook, place 25g of butter together with 1 tablespoon of olive oil in a large frying pan over a medium heat. When the butter has melted, add the sliced onion. Lower the heat and cook gently until the onion starts to turn golden (about 7 minutes). Add the rosemary and garlic and cook for a further minute. Remove from the heat and transfer to a bowl.
3.                 Wipe out the frying pan with kitchen paper before adding the remaining butter and olive oil. Place over a medium-high heat and when the butter has melted and stopped sizzling, add the potatoes cubes. Cook for about 5 minutes or until the sides of the cubes touching the pan have started to turn golden. Gently turn the potato cubes and continue cooking until gloriously golden all over.
4.                 Scatter the cooked onion mixture over the potatoes, sprinkle with a little sea salt and continue cooking for a minute or two to heat through. Serve as soon as you possibly can, although this dish will relax happily in a warm oven for 20 minutes if necessary.

Note: If preparing onions makes you cry, read on for some simple tips to avoid weeping into your sautéed potatoes...
When you cut into an onion, it releases a volatile compound that irritates nose and eyes. Use a sharp knife to avoid excessively crushing the onion cells, releasing less of the compound in the first place. Breathe through your mouth to avoid the onion vapours going up your nose and lean slightly away from the onion so that the vapours don’t rise into your eyes.
Or wear some stylish goggles like my lovely assistant, Naomi...
(Photo by Veronica Casey)
 
Pin It

Friday, September 15, 2017

Potato Gnocchi with Sage and Walnut Butter – Better a Dinner of Herbs...

Pin It There is a proverb which goes something like: Better a dinner of herbs where love is, than a fatted calf and hatred therewith. In other words, better to have modest offerings given with a generous heart than abundance offered with a mean spirit.

Gnocchi sounds so much more exotic than "potato dumpling"

My cupboard obviously has a generous heart. At first glance today, it appeared empty. Baked beans on toast for dinner... hmmmm. Think, Hester, think! Potatoes, flour, Parmesan, eggs, nuts, butter and plenty of herbs in the garden... channelling ... channelling... ggggggnnnnnn...  gnocchi!

For 3 to 4 servings you will need...

Gnocchi

550g Rooster or other floury potato, skin on
100g plain flour
2g  (½ teaspoon) baking powder
½ teaspoon fine table salt
1 egg, beaten


A little extra flour for dusting

1                  Place the potatoes in a medium saucepan and carefully add just enough boiling water to cover. Bring to the boil then reduce the heat to a simmer. Cover with a lid and cook gently for about 15 minutes or until easily pierced right through with the tip of a knife. Drain the cooked potatoes and leave them aside for about 5 minutes or until just cool enough to handle. Gently peel, then push the potatoes through a potato ricer, catching them in a large mixing bowl. If you don’t have a ricer, mash them with a regular potato masher. Using a fork, gently spread the potato out into an even layer without compacting it. Leave to cool.
2                  Next, sprinkle in the flour and baking powder and lightly combine until the mixture resembles ground almonds.
3                 Add the beaten egg and mix gently using a fork to bring the ingredients together. When the egg has been evenly dispersed throughout, bring the mixture together in a ball, using floured hands.


4                 Turn out onto a floured work surface. Divide the mixture into about 4 portions and roll each into a rope about the thickness of your thumb. Using a sharp knife, cut each rope into pillows of dough about 1.5cm long (half an inch).
5                 Place each pillow of dough, one at a time, cut side down in the palm of your lightly floured hand. Press gently with the back of a fork so that it forms a slightly ridged indent. This helps the gnocchi hold any sauce you care to add. (You can freeze them on a tray at this point and transfer the frozen gnocchi to a freezer bag. Cook from frozen.)
6                 To cook: bring a medium saucepan of water to boil. Carefully drop the shaped gnocchi into the pan one at a time. They will sink to the bottom of the pan. Don’t add more than will cover the base of the saucepan in a single layer. Make sure the water comes back to simmering, turning up the heat if necessary. When the gnocchi rise to the surface continue cooking for a further 3 minutes. When the gnocchi are cooked, drain and add to your favourite sauce.

The humble potato gets an Italian makeover

Gorgonzola or porcini sauces are particularly good with gnocchi. Today, however, I’m all about the simple so here’s how my sauce goes...

Sage and Walnut Butter

70g butter
50g finely chopped walnuts
3 tablespoons finely chopped flat leaved parsley
1 tablespoon finely chopped fresh sage
1 fat clove garlic, crushed
Parmesan
Black pepper


1                 Melt the butter in a frying pan over a medium heat until sizzling. Add the cooked gnocchi to the pan in a single layer and fry gently until golden brown – about 3 minutes. Turn to brown the other side and add the walnuts at the same time. After 2 minutes, add the crushed garlic and herbs and cook gently for a further minute or so.
2                 Transfer to a warm serving dish and scatter with parmesan shavings.

Just add Parmesan

Better than beans on toast!
Pin It

Monday, August 7, 2017

Rosehip and Honey Pannacotta – A Conspiracy Theory

Pin It When I travel, I love to taste local dishes on the grounds that if you order food in its natural environment, it is produced by people who love the dish and who know how it should taste.

Sometimes life and waiters conspire against me.

Happiness is... Rosehip and Honey Pannacotta

In the States, I have tried repeatedly to taste an authentic American cornbread. On each occasion, my order has been misheard (perhaps the Irish accent – “so charming honey”, but clearly unintelligible) or “the kitchen’s just out”.

If pannacotta was a flower it would be sweetpea
The same goes for Pannacotta. I have tried in Venice. I have tried in Verona. I have even tried several Italian restaurants in Ireland where surely they’d be used to the accent. On each occasion I have been brought a delicious dessert but not Pannacotta. Am I saying it wrong? Pah-nah-cot-ah?  PAHna COHtah? PannaCOTTa?
Straight from the hedgerows ;-)

This has happened so often that I have evolved a theory: Some people closely guard the location of their favourite restaurant in case it gets too popular... Perhaps, cornbread and Pannacotta are just too good to share.

Clearly, I am just going to have to make my own to find out.

For 6 servings you will need...
...to lightly oil 6 ramekins, cups or moulds with a flavourless oil
4 sheets of gelatine
250mls double (heavy) cream
300mls Greek yoghurt
60g runny honey
50mls rosehip syrup or cordial (undiluted)


Rosehip and Honey Dressing
2 tablespoons runny honey
1 tablespoon rosehip syrup or cordial (undiluted)

A selection of fresh berries to serve


1                    Place the gelatine in a bowl of cold water and leave it for about 5 minutes to soften.
2                    Meanwhile, in a medium saucepan heat the cream and honey together until just simmering at the edges. Remove from the heat.
3                    Drain off the water from the gelatine and squeeze out any excess. Replace in the empty bowl and add a little of the hot cream mixture. Stir together until the gelatine has dissolved completely. Pour the gelatine mixture into the saucepan and stir to disperse it through the liquid. Add in the Greek yoghurt and stir the mixture with a whisk until the yoghurt has blended smoothly into the liquid. Don’t go too crazy with the whisk. You don’t want to incorporate loads of bubbles into the mixture.
4                    Finally, stir in the rosehip cordial or syrup until dispersed through the mixture. Divide between the oiled containers. Cover with cling film and refrigerate until set (at least 6 hours – or overnight if possible).
5                    Just before serving, make the Rosehip and Honey Dressing by mixing together the honey and syrup/cordial until combined.
6                    To remove the Pannacotta from each container, sit them briefly into hot water until they loosen at the edges, then cover with a serving plate and flip over. If Murphy’s Law doesn’t come into play, you’ll end up with a perfect Pannacotta ready to be surrounded by fresh berries and drizzled with Rosehip and Honey Dressing.

Make it the day before for a super-easy delightful dessert
(If Murphy’s Law does come into play, or you get distracted, it could end up on the floor...)
Pin It

Thursday, July 20, 2017

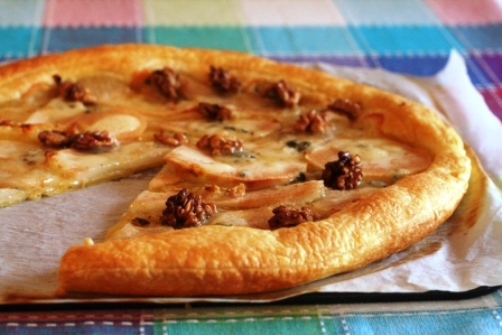
Pear, Walnut and Roquefort Tart – exceptionally lazy (and tasty!)

Pin It
An exceptionally lazy (and tasty) tart


If I get reincarnated as a mouse, I am in big, big trouble because - quite apart from grey not being my best colour - in general (gasp!) I don’t like cheese very much. This is a major failing which I try to correct. When I find myself faced with a cheeseboard, I will taste a molecule of everything just to make sure I still don’t like it. Mostly, I still don’t.

One of the few exceptions is creamy, salty Roquefort, which I treat as a seasoning - for salads and for this exceptionally lazy tart. So simple, this is barely a recipe, however the pastry must be good quality all butter pastry - there is nowhere for anything less to hide.

For 1 lazy tart (a quick snack for 2 or a canapé for 4 – 6) you will need…
… to pre-heat the oven to 190˚C

1 x 220g sheet of ready-made all butter puff pastry
1 large sweet pear (such as Comice) peeled and very thinly sliced
50g Roquefort, cut or crumbled into pieces about the size of a hazelnut
25g walnut halves
10g salted butter

1.                 Using a sharp knife, score a line around the edge of the pastry sheet about 2cm from the edge, being careful not to cut all the way through.
2.                 Taking care to avoid the margin you’ve just created, arrange the pear slices in one layer on top of the pastry. At this point the tart looks very mean and you’ll be tempted to add more pear slices. Hold your nerve. The tart will be soggy if you overdo the fruit. Distribute the pieces of cheese evenly over the surface of the tart, followed by the walnut halves. Dot the pieces of pear with the salted butter. Place in the pre-heated oven and bake for 12 – 15 minutes until the pastry is golden and cooked through and the cheese melted. Serve hot or warm.

A cheesy snack for gourmet mice ;)


Variation: You could drizzle a little clear honey over the top of the cooked tart for a little hit of sweetness.
Pin It

Monday, June 12, 2017

Lemon, Honey and Basil Ice Cream - it'd be a crime to miss it !

Pin It


Some years ago a very pleasant trip to visit a friend in France took a rather strange twist that involved a very unique (and ever so slightly stolen) car, being fingerprinted by French police (who also offered great advice on where to dine in the vicinity), and a lemon. Long story.  I’ll tell you when you come round to visit.
I was given the lemon, as a souvenir of this strange adventure, which I took back to Ireland and made into ice cream. It was the first ice cream I ever made and was a convoluted process. Was it the most exciting ice cream I’ve ever tasted? No. But it served to send me on a quest for a lemony ice cream that would create for my taste buds a little of the excitement of that trip, and here it is.

Strictly speaking, this is a frozen yoghurt but because it is Greek yoghurt it is every bit as satisfyingly creamy as an ice cream. It is also dead easy to make. With such a high juice content, you really do need an ice cream maker for this. Note: This ice cream is for grown-ups.

For 4 - 6 servings you will need...
... an ice cream maker

Zest of 2 lemons, grated
Zest of 1 orange, grated
175mls fresh lemon juice
75mls fresh orange juice
10g fresh basil leaves
140g runny honey
550g Greek yoghurt
¼ teaspoon sea salt 

1                    Place everything except the Greek yoghurt in a small saucepan and bring to the boil. Immediately remove from the heat and leave to cool. Strain to remove the zest and basil leaves. Leave to cool, then chill in the refrigerator for about 30 minutes.
2                    When chilled, mix with the Greek yoghurt and salt and churn in your ice cream maker according to manufacturer’s instructions. When the mixture has thickened to ice cream, transfer it to a freezer container and place in the freezer for 24 hours. Although it is ready to eat straight away, the flavours develop further if you can bear to wait until the following day. Before serving, allow to soften in the fridge for 20-25 minutes.

Taste-tester verdict: "Gasp!" but in a good way. 
Pin It

Friday, May 5, 2017

White Chocolate and Raspberry Paris-Brest - they're wheel-y wheel-y delicious!

Pin It


Who doesn’t, at some stage, have lonely egg yolks languishing in their fridge. There they sit, dreaming of a better life, (cue violins) until one day the fridge door opens... light floods in... and their crusted remains are consigned to the bin. Awwwwww...


"I coulda been a contender. I coulda been been somebody..." Eggy Malloy, On the Waterfront
The talented and lovely Jill Colonna, author of Mad About Macarons le book, and le blog (and now Teatime in Paris) threw down the gauntlet of the egg yolk challenge and I happily accepted an invitation to guest post on what was then the first anniversary of Alchemy, back in 2011. 
The egg yolk challenge was a great idea because we've all had a bowl of forlorn egg yolks sitting in the fridge at some point. Having been parted from their whites – who have gone on to star as Magnificent Macarons, Marvellous Meringues, or Superb Soufflés – the poor old yolk tends to be forgotten.
Egg yolks can achieve greatness too. After all, Botticelli painted The Birth of Venus using egg yolk-based paint. While Botticelli provided a feast for the eyes, here is something you can actually get your teeth into.  Gateau Paris-Brest is a delectable choux pastry, named after the famous Paris – Brest bicycle race. The shape represents a wheel. Here it is in miniature, my Summery version with raspberries and white chocolate pastry cream.

L'inspiration - a velo at Saint-Guilhem-le-Désert (which I always read as 'dessert'...)
For 10 – 12 gorgeous little pastries you will need…
Pastry Cream (crème pâtissière)
300mls fresh milk
50g caster sugar
½ teaspoon vanilla extract
a pinch of salt
15g plain flour
15g cornflour
4 egg yolks
50g good quality white chocolate, chopped

Heat the milk in a medium saucepan until just simmering.

Meanwhile, in a medium mixing bowl, whisk the egg yolks together with the vanilla extract and sugar until thick and paler in colour. Add in the salt, plain flour and cornflour and whisk until incorporated.

Slowly add the simmering milk to the egg yolk mixture, whisking all the time (never add cold eggs to hot liquid unless you want scrambled eggs). Mix well and return the liquid to the saucepan. Continue to whisk over a low heat until the liquid has become a thick custard. This will take about 3 or 4 minutes. Make sure not to boil the custard or it will become grainy and may scramble. The custard is thick enough when it coats the back of a wooden spoon and a finger pulled though this coating leaves a clean trail.

Add in the white chocolate and stir until it has melted into the custard.
Transfer to a bowl and cover with cling film, making sure the cling film makes contact with the surface to prevent a skin from forming. Chill until ready to use. This can be prepared ahead and will keep in the refrigerator for several days.

Egg yolks – in the right company – are capable of greatness too


Choux Pastries
150mls water
50g butter
70g strong white flour/plain flour
A pinch of fine salt
2 eggs beaten
25g flaked almonds

You will also need a punnet of fresh raspberries

when you are ready to bake the choux wheels.

Heat the water and butter together in a medium saucepan until the butter has melted and the liquid is simmering

Carefully tip the flour and salt into the liquid in one go. Stir with a wooden spoon until the mixture comes together in a soft ball of paste and no dry flour remains. Spread the ball of paste over the bottom of the saucepan and leave to cool to room temperature.

When the paste has cooled, add in the beaten egg a little at a time, whisking well between additions. An electric whisk is best for this job. You want a smooth glossy soft paste that will hold its shape so check the mixture as you go along as you may not need to add all the egg.

Pre-heat the oven to 200°C (fan oven).  Transfer the mixture to a piping bag and pipe circles of the mixture (approximately 8cm/3 inches in diameter) onto a lightly buttered baking tray, leaving 5cm/2 inches between circles. Scatter the tops of the circles with almond flakes and transfer to the oven. Bake for approximately 15 minutes or until evenly golden brown. Remove from the oven and poke 2 horizontal slits in the side of each pastry to release some steam. Return to the oven for a further 2 minutes before removing to cool on a wire rack.

Assemble the little pastries just before serving: slice them in half horizontally. Beat the cooled pastry cream until smooth. For a really decadent touch, I sometimes stir a tablespoon of mandarin brandy into the pastry cream at this stage. Pipe onto the lower half of the pastry wheel and add fresh raspberries. Replace the top and dust with icing sugar.

These little pastries are perfect snack as you cycle from Paris to Brest, or perhaps keep a few beside your easel for energy as you paint a Renaissance masterpiece – using egg-yolk-based paint of course!


We taste wheel-y wheel-y delicious!

Pin It